Pleco for Android Instruction Manual : Flashcards
To access the Pleco flashcard system, press your device's menu button, then press "Flashcards." Basic flashcard functionality is available in our free app, but a greatly-enhanced flashcard system is available as a paid add-on - more details on how the paid version differs from the free one here.
Pleco includes a powerful built-in flashcard system that makes it easy for you to learn new vocabulary by creating flashcards based on dictionary entries. This means you can create new cards extremely quickly, since all you have to do is select the right word and Pleco can fill in the characters / Pinyin / definition for you automatically; it also helps with remembering new words you encounter, since you can easily add a word to your flashcard pool as you're looking up its meaning in the dictionary.
It's also been designed specifically for learning Chinese, which means we've been able to add test modes for Chinese-related subjects like tones, and we've been able to optimize other common flashcard system features to work better with Chinese; for example, our multiple-choice tests always make sure that the number of characters in the headword match the number of syllables in all of the possible Pinyin answers for it, which a non-Chinese-oriented system might not be able to do, and our flashcards keep track of both the simplified- and traditional-character versions of words.
The paid version of our flashcard add-on includes the following features that aren't found in the free version:
Here's the basic process for using Pleco flashcards:
And here are some important terms that will be used throughout this manual:
Card: A single vocabulary word which you'd like to learn. Cards can be based on dictionary entries or can have their own custom headwords and definitions. The same pool of flashcards is used throughout your copy of Pleco; a single flashcard can be included in multiple categories, and can be tested from any profile, it's not bound to any particular one.
Score: A measurement of how well you've learned a card. Pleco uses these scores to determine how often to show you each card; cards which you remember well will show up less often than cards that you have a hard time remembering, and cards that you've practiced a lot will show up less often than cards that you've just started learning. Specifically, cards with higher scores show up less often than cards with lower scores in frequency-adjusted tests, and cards with higher scores are repeated at longer intervals in repetition-spaced tests; by default, the number of days between card repetitions is equal to the card's score divided by 100.
Easiness: A second-order measurement of how well you've learned a card; it affects the rate at which your score increases when you answer a card correctly, and is adjusted up and down in small increments when you remember a card correctly or incorrectly.
Priority: How urgently Pleco should try to test you on this card. In repetition-spaced tests, cards with a higher priority will be shown before cards with a lower one, and with the limit unlearned cards option enabled, higher-priority cards will be added to the pool of cards to study before lower-priority ones. Change card priorities through the Card Info or Batch screens.
Category: A label which can be applied to groups of flashcards in order to organize them, like putting physical flashcards in a specific "deck" or "box". A flashcard can belong to an unlimited number of categories. You can create / delete / reorganize categories in the Organize Cards screen. Categories can be organized hierarchically, with categories grouped under other categories, so that you could have, say, a top-level category for a particular textbook with child categories underneath it for each chapter of that textbook.
You can use categories to organize flashcards in whatever way you like; for example, creating one category for each chapter in a textbook, so that you can easily review a specific set of chapters for a class exam. Since a flashcard can belong to more than one category, categories can also be used to remind yourself of particular details about a card; for example, you could create a category for words that you're not sure about the meaning of and need to ask a teacher/friend for help with, or one for words that people have told you are slang, or are only used in a particular region.
Profile: A collection of flashcard test settings. You can use profiles to make it easy to switch between different ways of reviewing flashcards; for example, one profile for multiple-choice tests and another for free-answer tests, or one to test yourself on characters and another to test yourself on Pinyin, or one to test yourself on HSK vocabulary and another that only tests words you've just learned in the past few weeks. You can create / delete profiles in the Manage Profiles screen.
Pleco comes with three different profiles built-in: Simple, which doesn't use scores at all but simply shows you all of the cards in your selected categories each time (in random order); Weighted, which shows cards you need more help with more frequently than cards you remember well, and Spaced Repetition, which shows you each card at a specific interval, increasing the interval each time to help transition the card from your short-term to your long-term memory.
Profiles are just collections of settings; they do not correspond to a specific set of cards or categories. You can access any card and any category regardless of which profile you're using. A profile is just a convenient way to remember a test configuration for later use, so that you don't have to go and manually reconfigure everything each time you want to run a particular type of test; most of your flashcard data is independent of which profile you're using.
Scorefile: A collection of flashcard scores; i.e., how well you've learned the material on each card, along with a detailed history of how well you've remembered it on recent tests. You can create / delete scorefiles in the Manage Scorefiles screen.
Scorefiles are a particularly unique feature of Pleco's flashcard system; they allow flashcards to have different scores for different types of test, instead of each card having just one score that applies to every test.
For example, if you've been studying Chinese for a long time but aren't very good at remembering Mandarin tones, you could set up a new scorefile just for testing yourself on how well you remember tones, and associate that scorefile with a profile you'd created for Tone Practice tests. Every card would start out in that new scorefile with the same low score, as if you'd just created it. As you studied these cards in Tone Practice, the cards that you remembered well, i.e. the cards for which you already knew / easily learned the tones, would see their scores increase quickly, while the cards you did poorly with, i.e. the ones on which you couldn't remember / didn't know the tones, would see their scores stay the same or increase more slowly. So as a result, the cards that came up most often in Tone Practice would be the ones that you had the most difficulty remembering the tones for, because those would be the cards with the lowest scores. However, the results of these tone practice sessions would not affect the scores in any other scorefile. So for another profile - say one for studying a card's meaning / definition - that linked to a different scorefile, the scores would continue to reflect how well you remembered that material, instead of how well you remembered tones; the cards you'd be seeing most often in definition tests would be the ones you had the most trouble remembering the definitions for, and getting a card incorrect on a tone test would not make it come up any more often on a definition test.
Each scorefile can be shared by multiple profiles, so it's possible to have several related profiles (say, a self-graded definition test and a multiple-choice definition test) share the same scorefile; in that case, the scores in it would be updated / shared between those test types. Each profile, however, can only link to one scorefile - it uses the information in the scorefile to select which cards to test you on, and it updates the information in the scorefile based on how well you remember each card. You can change which scorefile a profile links to when you initially create the profile in the Manage Profiles screen, and you can change that scorefile selection later in the Scoring tab of Advanced Settings. Scorefiles are just collections of scores, they don't have any specific settings / test types / categories associated with them; the only reason why a scorefile might correspond to a particular test type would be because of the profile(s) that linked to it.
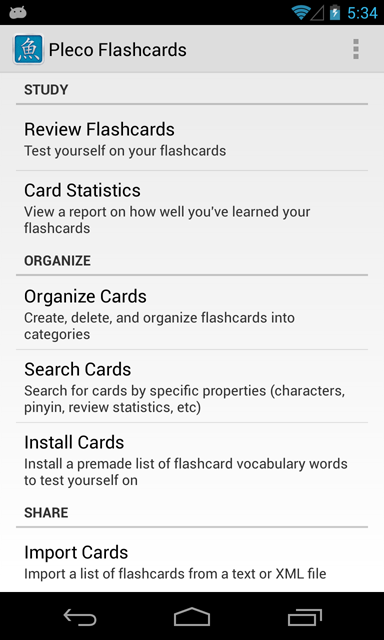
When you first open up the Flashcards tab, you'll be presented with this screen:
Don't be alarmed by all of the buttons; most of them can be ignored until you're comfortable with the basics of using flashcards.
Study
Review Flashcards - start a new flashcard test session, or resume a suspended one.
Card Statistics - review a summary of how many cards you've learned and how well you've learned them.
Organize
Organize Cards - inspect the flashcards you've created and group them into categories. You can also delete and perform other batch operations on cards through this screen.
Search Cards - search for specific flashcards using a wide range of criteria, and inspect / delete / change them as above.
Install Cards - install premade lists of flashcards (currently confined to just a single list of vocabulary from the popular HSK test, but more built-in lists are coming soon).
Share
Import Cards - import a list of flashcard vocabulary from a text or XML file.
Export Cards - export some or all of your flashcards to a text or XML file, as a backup or to share with others.
Protect
Backup Database - back up your entire flashcard database (cards, profile settings, scores, categories, etc) to a single file.
Restore Database - restore a previously backed-up flashcard database.
The easiest way to create a new flashcard is to tap on the Add To Flashcards ![]() button. This is available pretty much everywhere you see a dictionary entry in Pleco; in dictionary definitions, the popup definition bubble, document reader, and even during flashcard test sessions (tap on a character / word once the card has been revealed / answered to bring up a popup definition for it, from which you can then add that character / word to your flashcard database). You can also add flashcards to your database directly from a list of dictionary entries by tapping-and-holding on them and choosing "Add to Flashcards."
button. This is available pretty much everywhere you see a dictionary entry in Pleco; in dictionary definitions, the popup definition bubble, document reader, and even during flashcard test sessions (tap on a character / word once the card has been revealed / answered to bring up a popup definition for it, from which you can then add that character / word to your flashcard database). You can also add flashcards to your database directly from a list of dictionary entries by tapping-and-holding on them and choosing "Add to Flashcards."
By default, new flashcards are not part of any category; they show up in Organize Cards as "Uncategorized." You can choose a category to automatically add new cards to in Settings / Flashcards / Default category. Alternatively, if you tap-hold on the Add Card button, a list will pop up allowing you to choose a category for your new flashcard to be added to. This will also become the default category for additional cards you create, though you can disable that (so that the default category remains unchanged) in Settings / Flashcards / Categories / Non-sticky selection. The category selection popup normally only shows you a list of top-level categories (i.e., categories that aren't grouped underneath other categories); change that by enabling Settings / Flashcards / Categories / Mutli-level cat prompt.
You can create a flashcard that doesn't link to a dictionary entry, i.e. one with a custom headword and definition, through the Organize Cards screen - tap on the New Card button in that screen to create a brand new card and edit its text in the Edit Card screen. If you create it through the top level of Organize Cards, it'll be added to whatever your default category is (though you can choose a different one in Edit Card); otherwise, it'll be added to the category you're currently looking at.
The popup definition bubble and OCR module can be configured to automatically create custom flashcards when you attempt to add a word that no dictionary entry exists for - enable this via Settings / Popup Definition / Unknown word handling and Settings / OCR / Unknown word handling (set each to "Custom Card").
By default, Pleco only allows you to create one flashcard with a given headword and pronunciation, so that you won't end up wasting time studying the same word twice. It does allow duplicated cards with the same characters but different pronunciations, or with the same simplified characters but different traditional characters; a card is only considered a duplicate if the simplified headword, traditional headword and pronunciation all match.
When you tap on the + button to create a flashcard, Pleco will flash "Card created" if the card was created successfully, or "Added to category" if the card already existed but was added to a new category (as a result of your selecting a specific category to add it to by tap-holding on the + button). If the card already exists and is already in the selected category, you'll be presented with the following prompt:
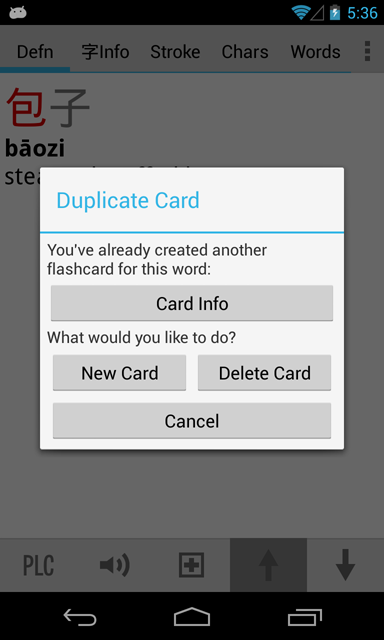
Card Info brings up the Card Info screen with more information on the duplicated card, New Card ignores the fact that the card is a duplicate and creates it anyway, Delete Card deletes the existing card, Remove Category removes it from the current category but doesn't delete it altogether, and Cancel doesn't do anything.
If Pleco is configured to show a prompt like this for duplicated cards that aren't in your current category as well, an Add to Category button will replace the Remove Category one. Also, an Update Text button will appear in this dialog if the card already exists but links to a different dictionary entry (or some custom text) - tap on that to update the existing card to use your current dictionary entry.
When editing a card in the Edit Card screen, an alert will come up when you try to save the card if doing that would result in a duplicated card; you can cancel the edit or allow the card to be duplicated.
You can change Pleco's duplicate card handling in Settings / Flashcards, choosing any of the above options as the default or adding a prompt / choosing a different behavior when the card exists but is not in the current category.
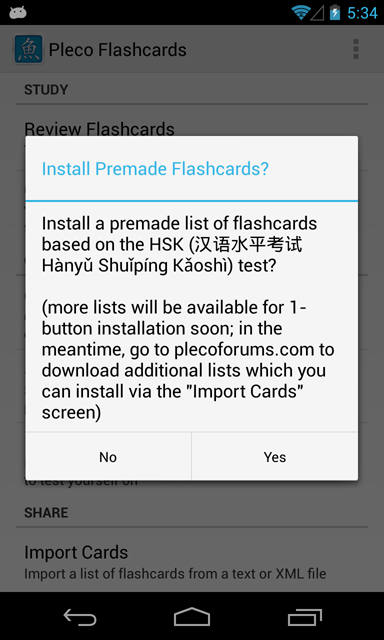
Pleco also supports installing premade flashcards from built-in flashcard list files; we currently only include a single set of those (from the popular mainland HSK test), but more are coming soon. Tap on the "Install Cards" button in the main flashcard screen to install them; the prompt to do so will also show up automatically when you open the main flashcard screen without having created any flashcards.
Pleco includes a powerful data importer that allows you to share / transfer flashcard data between devices, populate your flashcard database with premade vocabulary lists, or bring in flashcards from an older version of Pleco. Of particular note is the fact that it can automatically match up words in vocabulary lists to entries in Pleco's built-in dictionaries; this allows you to generate a full set of flashcards from just a list of words.
To import cards into Pleco, tap on Import Cards in the main flashcards screen to bring up this screen:
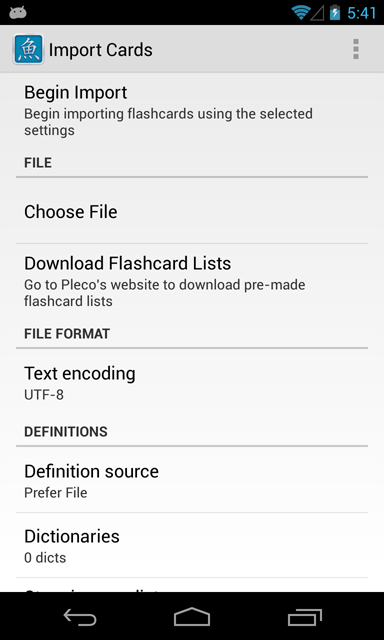
If you're importing a flashcard file from Pleco's website, or a file exported from a copy of our software on another platform, the only items you need to be interested in here are the first two - everything else on the screen should already be configured correctly. Tap on Choose File to select a vocabulary file to import, then tap on Begin Import to start importing it; a screen will show up with a preview of the file to let you confirm that Pleco opened it correctly, and assuming it did, tap Yes to begin importing the file. Download Flashcard Lists takes you to a page on our website with some ready-made flashcard lists for you to download and import.
Only visible if you've selected a text file in "Choose File," Text encoding tells Pleco what system was used to encode Chinese characters in the import file; in most cases, you'll want to select "UTF-8" - that's the format used by all of the text files on our website, and most other websites offering Pleco flashcard lists also use that encoding. You can double-check that you selected the correct encoding in the preview screen that comes up after you tap on Begin Import.
Definition source lets you choose where you want Pleco to gets its definitions from for the newly-created flashcards. "Prefer File" (default option) will use the definition provided in the flashcard file if there is one, but otherwise will attempt to find a definition for the word in one of its dictionaries. "Prefer Dicts" will try to find a dictionary definition for the card first, but fall back on the definition in the file (if there is one) if it can't find a matching dictionary entry. "Dicts Only" will only use dictionary definitions and ignore any definitions in the file; "File Only" will only use definitions in the file and not try to match up any words to dictionary entries.
Tap on Dictionaries to choose which dictionaries Pleco will attempt to match the imported flashcards to; on that screen, drag around dictionaries to reorder them or drag a dictionary down to "Inactive Dictionaries" to disable it altogether.
With Store in user dict enabled, for flashcards that include their own definitions (rather than linking to dictionary entries), those definitions will be stored in your user dictionary database instead of in the flashcard database, letting you search for / edit them like other user dictionary entries. If you've created more than one user dictionary, Pleco will use the first one listed in Dictionaries above, or if no user dictionaries are listed there, it'll choose the one that appears highest in the sort order in Manage Dictionaries.
Under Problem Handling, Missing entries determines how Pleco handles imported cards which don't supply their own definitions and for which Pleco can't find any definitions in any of its built-in dictionaries. Select "Skip" to ignore these cards, or "Create Blank" to create them without definitions. You can find / edit those cards later by doing a search for "incomplete" in the Search Cards screen.
The next option is for Ambiguous entries - this determines what Pleco will do when it encounters a word in the import file that matches more than one dictionary entry (in the first dictionary that it finds a match in). Select "Use First" to use whatever entry it finds first; "Skip" to not create the card at all (not recommended), or "Prompt" to pop up a dialog box allowing you to select the correct dictionary entry for the new card.
After that is Duplicate entries - this determines how Pleco will handle imported cards which are duplicates of existing ones. Select "Allow" to create the card anyway (ignoring the fact that it's a duplicate), "Skip" to not create the card, "Merge Cats" to not create a new card but add the old (duplicated) card to whatever categories the new card belongs to, "Update Text" to update the text of the old card to match the new one," "Update + Merge" to do both of these, and "Prompt" to pop up a dialog box for each duplicated card letting you decide what you want to do with it. We recommend "Merge Cats" or "Update + Merge" unless you have a particular reason to prefer another option - it generally provides the best results.
Enabling Unsafe mode will significantly speed up the flashcard import, but at the risk of permanently corrupting your flashcard database if the import fails; MAKE SURE to back up your database before importing cards with this option enabled.
Finally, tap Undo last import to reverse your most recent flashcard import, deleting any cards / categories created by it.
With "Ambiguous entries" set to "Prompt," you'll see the following screen come up whenever Pleco's importer encounters a word that matches more than one dictionary entry:
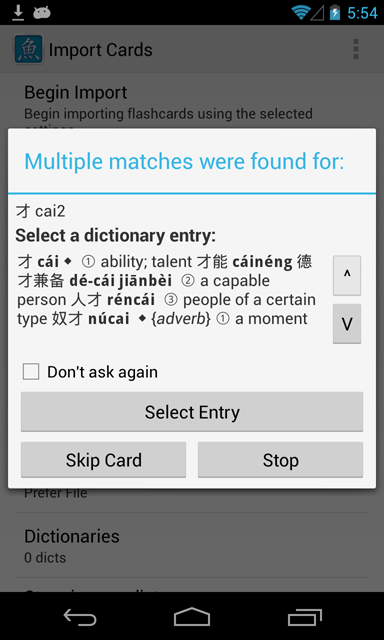
Tap on the arrow buttons at the right of the dictionary entry to scroll through the available choices, then tap on Select Entry to choose that entry for the card. Skip Card will skip importing the card altogether and continue on with the next card, and Stop stops the entire flashcard import process. Enable Don't ask again before tapping on the Select Entry or Skip Card options to make that the default for additional ambiguous cards - with "Select Entry" Pleco will choose the first entry it finds in later ambiguous cards, while with "Skip Card" it will skip importing other ambiguous cards entirely.
With "Duplicate Entries" set to "Prompt," you'll see this screen come up when Pleco encounters a word that matches an existing flashcard:
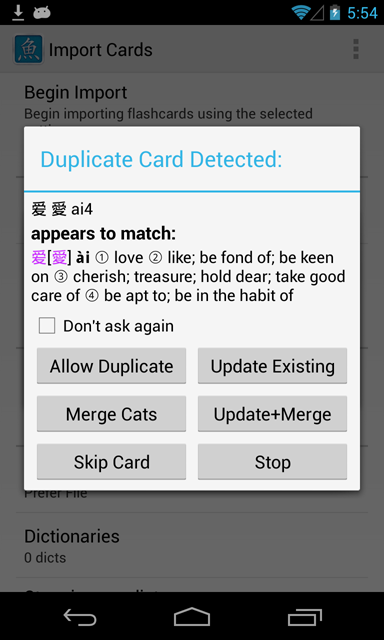
Tap on Allow Duplicate to create a new flashcard anyway, Update Existing to update the text of the existing card, Merge Cats to keep the existing card but add it to any new categories, Update + Merge to do both of these, Skip Card to leave the old flashcard intact but not create a new one, or Stop to stop the entire flashcard import process.
Enable Don't ask again before tapping on one of these options to make that the default for additional duplicate cards.
Pleco's built-in flashcard exporter lets you output your flashcards to a text / XML file in order to back them up, share them with others, or transfer them to another program. Tap on "Export Cards" in the main flashcards screen to bring up this screen:
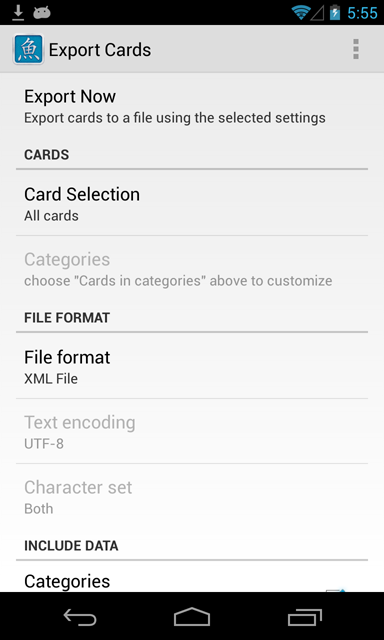
Tap on Export Now to choose a filename and begin outputting your cards to a file.
Use the Card Selection control at the top of the screen to select which cards you want to export; "all cards" exports all of your flashcards and "cards in categories" exports only cards in the specified categories. With "cards in categories," tap on Categories to select which categories you'd actually like to include in the export. If you're bringing up the Export screen from the Organize / Search Cards screens via Batch, there'll be an additional "search results" option here, which exports the cards listed in the current Manage Flashcards search result.
File format lets you select which type of file you'd like to put your flashcards in. An "XML File" can include all of your flashcard data - statistics, which dictionaries each card links to, etc - but is larger and more complicated to read, while a "Text File" includes only a list of words, their pronunciations, their definitions (for dictionaries that allow definition exports), and which categories they belong to; it is, however, smaller, easier to read / print on your computer, and more compatible with other flashcard programs and earlier versions of Pleco.
The next two options only appear if you're exporting a Text File. For Text encoding, UTF-8 is the best choice in most cases, since it should open seamlessly in most desktop text editors and other programs (which can usually detect automatically that a text file is encoded in UTF-8). For Character set, choose "Simplified" to export flashcards with simplified-character headwords, "Traditional" for traditional-character ones or "Both" for both character sets (with the traditional characters in brackets).
Under Include Data, you can configure which parts of your flashcards you'd like to embed in the exported file. Categories exports the categories flashcards are assigned to; Text / PalmDoc files are formatted as lists of cards for each category, so cards under more than one category will be exported multiple times. Statistics (only in XML files) outputs card score and review history information - it does this for every scorefile, not just the currently-active one. Card definitions outputs definitions from custom flashcards (but not from dictionary entries). Dictionary definitions outputs definitions from cards that link to definitions in dictionaries that allow their definitions to be exported; currently, this means any free or user-created dictionary plus the paid ABC and PLC dictionaries. Enable Remap if forbidden to attempt to remap cards linking to other, non-exportable dictionaries to dictionaries do allow exports.
At the time of this writing, the schema for the XML flashcard import/export format wasn't finalized yet; once it is, we'll post it in the knowledge base in the Support section of our website. The format for Text files is described below.
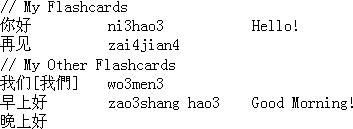
A text flashcard import file consists of a list of vocabulary words, one per line, interspersed with the names of the flashcard categories those words belong to. Each individual line is formatted like this:
characters<tab>Pinyin pronunciation<tab>definition
If you supply a definition in the import file, that will always be used as the card's definition; if you don't supply one, Pleco will attempt to find one in its built-in dictionaries. Pleco can also fill in the Pinyin pronunciation if you skip that. Make sure not to use more than one tab in each of those <tab> spaces, otherwise the importer might get confused about whether it's reading Pinyin or the definition for a word.
Pinyin syllables should be entered with tone numbers after each syllable, just as in a Pinyin dictionary search; Pinyin with tone marks is also supported, but it's a bit less reliable, and in UTF-8 and UTF-16 files it only works with actual characters (Unicode range 0000-01DC) and not with combining diacritical marks, so if possible you should always use tone numbers. (Zhuyin is not supported in import files yet, though the resulting cards will be displayed with Zhuyin pronunciations if you've configured Pleco to use them instead of Pinyin)
You can supply simplified characters, traditional characters, or both in the character portion of the line - if you're supplying both, put the simplified characters first and the traditional characters immediately after them enclosed by square brackets (as with "wo3men" in the above example; simplified[traditional]).
A "//" at the start of a line indicates that this is the beginning of a new flashcard category. Pleco will file all flashcards coming after that line under the specified category, until it reaches another "//" line, at which point it will start adding flashcards to that line's category instead (and stop adding them to the previous category).
So in the above example, Pleco would create cards for ni3hao and zai4jian4 under the "My Flashcards" category, using the custom definition "Hello!" for ni3hao3 and searching its dictionaries for a definition for zai4jian4. wo3men3, zao3shang hao3, and the last item (wan3shang hao3) would all be created under the "My Other Flashcards" category instead - zao3shang hao3 would be created with the custom definition "Good Morning!", wo3men3 would have its definition filled in from a dictionary entry, and zao3shang hao3 would have both its definition and its Pinyin filled in from a dictionary entry.
For English-to-Chinese flashcards (only supported if you've enabled the corresponding option in Settings / Flashcards), use the format:
word<tab>definition
As with C-E flashcards, if you don't supply a definition Pleco will attempt to fill it in from a dictionary entry.
After you've created your file, you can get it on your phone by copying it to its SD card; the easiest way to do that is to connect it to your computer via USB, drag down its notification bar, and tap on the relevant item to mount it as a USB drive on your PC. Any location on the SD card will do; just make sure that you remember where you put it so you can find it in Pleco's file browser later on. You can also send it to yourself as an email attachment, upload it to a file-sharing service like Dropbox, or do anything else that you can normally do with a document file on your phone's SD card.
Tap on "Organize Cards" in the main flashcards screen to bring up this screen:
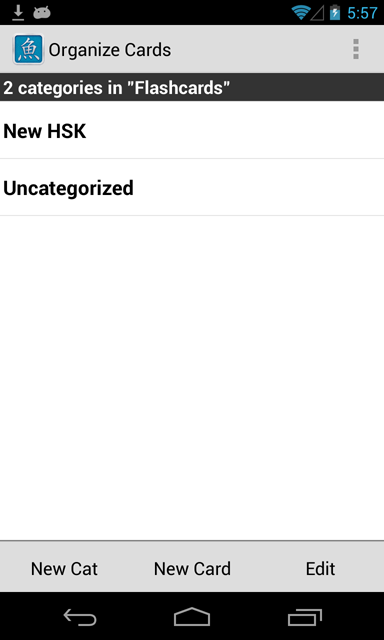
Until you start grouping your cards into categories, all of them will show up under Uncategorized. Tap on a category to display a list of cards and other categories grouped under it:
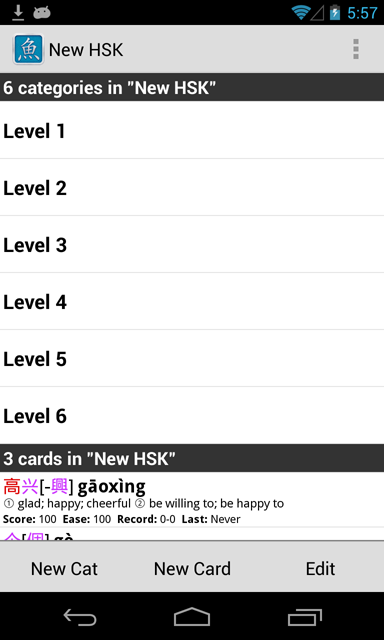
Tap on an individual card to bring it up in the Card Info screen. You can change the font sizes / arrangement of text in each flashcard item or add an extra text line with basic statistics (score etc) in Settings / Flashcards / List Views.
Tap on New Card to create a new custom card in the Edit Card screen, and on New Category to create a new category: enter the new category's name and tap Done to create it. Tap-hold on a category's name to bring up a menu from which you can modify it.
Manipulating Cards And Categories
Tap on the Edit button at the top right corner of the Organize Cards screen to put it into Edit Mode:
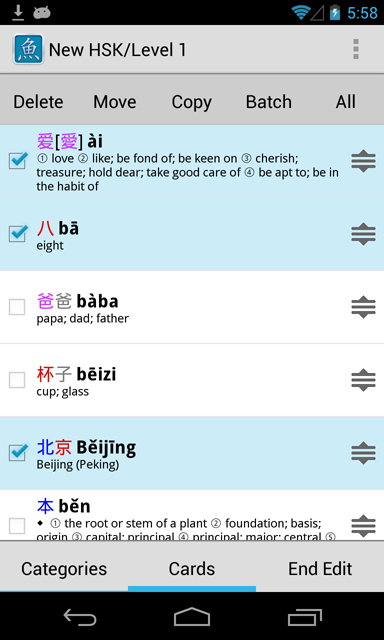
Select "Cards" or "Categories" at the top of the screen to choose whether you want to delete / reorganize cards or categories.
Tap on a card or category to select or deselect it (multiple items can be selected at once), then tap on Delete to delete the selected items, Move to move them to a new category (removing them from the old category), Copy to copy them to a new category (keeping them in the old category), Batch (cards only) to perform other operations on the selected items, or All / None to select all / deselect all items. Both Move and Copy bring up the following category selection screen:
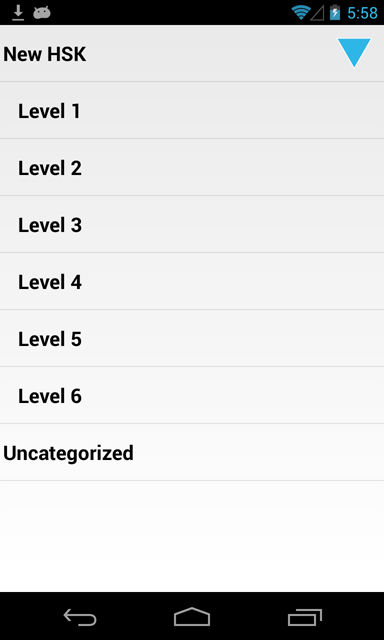
Tap on one of the ![]() buttons at the right of a category to view a list of other categories grouped under it.
buttons at the right of a category to view a list of other categories grouped under it.
Categories in Pleco can be organized hierarchically, just like folders on a computer, with each category able to have other categories buried inside of it, so you can Move / Copy categories into other categories in order to organize them more efficiently.
You can change the order of categories, or of cards within a particular category, by tapping and dragging on the handle![]() located on the right side of each list item.
located on the right side of each list item.
Note that "Copy"-ing a card does not actually create a second copy of it in Pleco's database; instead, it adds that card to the new category while also leaving it in the old one. The same set of flashcard statistics are kept for the card in both categories, and changing its text / remapping it to a different dictionary in one category will also change it in the other. Also, the "Copy" function is not available in the special Uncategorized category, since if a card belongs to some other category then by definition it's no longer Uncategorized.
Tap on a card in Organize Cards to bring up the Card Info screen on it. You can also bring up this screen by tapping on the Card Info button during a flashcard session (after the card has been answered or revealed).
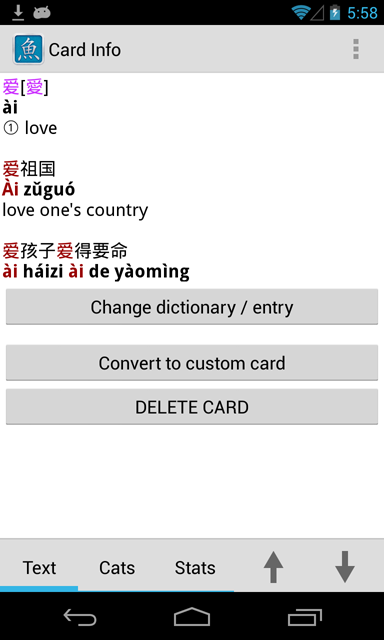
The buttons at the top right corner of the screen let you quickly scroll through multiple cards in a category / set of search results.
In the Text tab, the options available vary depending on whether or not this card links to a dictionary entry.
In a dictionary-linked card, tap on Change dictionary / entry to bring up a standard Pleco definition screen; choose a new dictionary entry using the scroll buttons at the top of the screen and the dictionary selection button at the bottom right corner, and tap Set New Entry to set it as the new dictionary entry for the card. Tap on Convert to custom card to convert it to a non-dictionary-linked card; an Edit Card screen will come up, prepopulated with the text of the card's dictionary entry.
In a custom card, tap on Edit card text to change the card's text in the Edit Card screen, Convert to dict-based card to convert the card to a dictionary-linked card (as above, you'll be presented with a standard dictionary definition screen and a Set New Entry button), and Convert to user dictionary entry to output the card's text to a new user dictionary entry and link it to that.
The Categories tab lets you view a list of all of the categories that a card belongs to and add / remove it from categories.
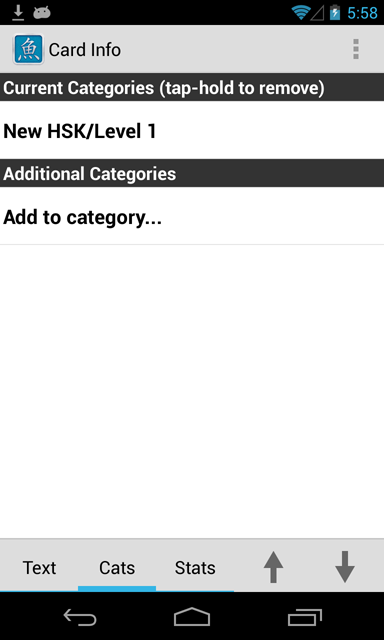
Tap on a category under "Current Categories" to remove the card from the category, or tap on "Add to Category" to pop up a screen where you can choose a new category to add the card to.
The Statistics tab lets you view and edit information on how well you've learned the card:
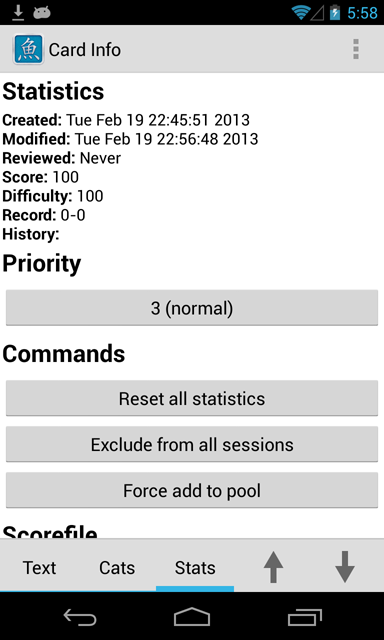
Created lists the date/time when the card was created, and Reviewed the date / time when you were most recently tested on it.
Score lists the card's current score, a rating of how well you've learned it. Easiness lists the card's current easiness factor, which affects how much the score increases after a correct answer.
Record lists the number of times you've remembered the card correctly and incorrectly.
History shows the exact history of correct / incorrect answers for the card, in reverse chronological order. If you're not using detailed answer scoring, the 6es stand for correct answers and the 2s for incorrect ones.
Below these, the Priority option lets you set a card's priority - how urgently repetition-spaced tests and the limit unlearned system try to test you on it.
In the next section, "Commands," Reset all statistics resets all of the above statistics - last reviewed date, score, easiness, record, history - to their default values; it will be as if the card is brand-new and has never been reviewed before. Exclude from all sessions causes this flashcard to never come up in any test session (using this scorefile), regardless of how the session is configured in other ways; Don't exclude from sessions deactivates that.
Force add to pool (disabled by Don't force add to pool) is specifically for use with the limit unlearned feature - it forces a card to start coming up in tests even if you already have more than the maximum number of unlearned cards in your study pool. Once a card has been reviewed at least once, though, it's automatically part of your study pool, and this setting no longer has any effect; the only way to remove it from your pool at that point is with the Exclude command above.
Finally, the Scorefile option lets you select which scorefile the above statistics will be drawn from, and which scorefile the reset / priority / exclude / force add commands will apply to.
Tap on the "Edit card text" button when viewing a custom flashcard in the Card Info screen to bring up the Edit Card screen, allowing you to edit the text of the card. This screen will also come up when you tap on the "New Card" button in Organize Cards to allow you to edit the newly-created card.
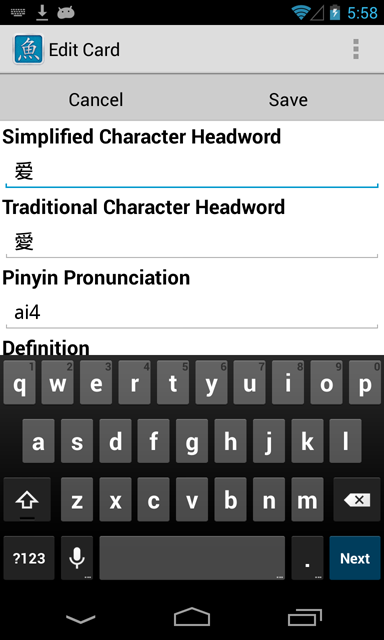
Tap on each field - Simplified Character Headword, Traditional Character Headword, Pinyin Pronunciation and Definition to edit its text. You'll need to download a Chinese input method from Android Market in order to enter Chinese characters here - we haven't yet added our own built-in method for doing so.
Tap on Save to save the text once you finish editing it, or Cancel to leave the card unchanged. When creating a new card from the top level of Organize Cards, a "Category" selector appears below the Definition field, allowing you to choose an initial category for the new card to be added to.
Tap-and-hold on the name of a category in Organize Cards to bring up this screen:
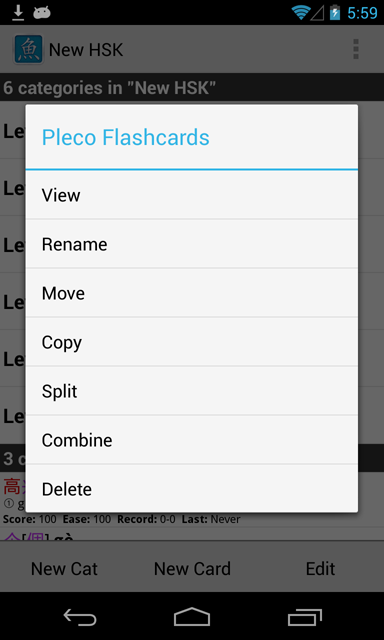
View shows a list of cards in the category (just as if you'd tapped on it), and Move and Copy work as they do in edit mode. Rename lets you select a new name for the category, and Delete deletes it.
Splitting a category (only available in categories that don't have any other categories grouped under them) is a convenient way to break up a large list of vocabulary (say, an entire 2000-word HSK level) into more manageable pieces, so that you can introduce them into your flashcard study gradually and not all-at-once. Enter the number of cards that you want in each of the new, split parts in the Split into categories of box, select whether you want the split to be Alternating (each card is in a different category than its neighbors, so the first card goes in New Category 1, the second card goes in New Category 2, third card in New Category 3, fourth card back to New Category 1, etc) or Sequential (first 1/3 of your cards go into New Category 1, second 1/3 of your cards go into New Category 2, etc), and finally tap on Split Now to perform the split.
Combine is only available if a category has other categories grouped under it; tap on it to combine all of those categories back together into this single parent. (this will effectively undo a previous Split, though it may leave the cards in a different order than they were in before)
Tap on the Batch button at the bottom of the Organize Cards screen in Edit mode to bring up a screen with additional options for changing / transforming your cards:

The Apply changes to option at the top of the screen lets you select whether you want to change just the cards you've selected ("selected cards,") all of the cards in the currently displayed category / search results ("listed cards,") or every flashcard in your collection ("all cards.")
In the next section, "Category," choose a category and tap Add cards to category to add all of these cards to that category (also leaving them in any other category they were already in), or Remove cards from category to remove them from that category (making them "Uncategorized" if they don't belong to any other category.) Tap on Remove from all categories to remove the cards from every category they belong to, making them "Uncategorized."
The "Dictionary" section contains the very powerful Remap to dictionary command - this attempts to permanently change which dictionary the selected cards get their definitions from. In other words, it looks for a definition in that dictionary that matches the card's headword and links the card to that dictionary definition instead of the (dictionary-based or custom) definition it's currently using. If a matching entry can't be found, the card will continue to link to the dictionary it linked to before. When more than one matching entry is found for a card, a prompt will appear asking you to select the correct entry. (for a less permanent change, you can temporarily remap cards during a single flashcard session using with the "Remap Cards to dicts" option in the Display section of the Review Flashcards screen)
The Rebuild from dict entries option updates all dictionary-linked flashcards' headwords and Pinyin pronunciations to match those in the dictionary entries they link to; this is useful after a dictionary is updated, since there may occasionally be corrections to specific characters, Pinyin tones, etc. Convert all custom to user dict converts all custom flashcards to user dictionary entries; i.e., it outputs their headword / pronunciation / definition to a new user dictionary entry, then links the card to that entry, allowing you to then search for it in dictionary lookups.
The "Score" section lets you make various adjustments to cards' scores. Change score lets you choose the type of adjustment you want to make: "reset to" simply sets all of the cards' scores to a specific value, and "increase by" and "decrease by" let you increase or decrease scores by a specific number of points, or by a specific % of their current score. "rand increase" and "rand decrease" are very useful for repetition-spaced tests - they increase or decrease each card's score by a different random number for each card, a random number between 0 and a number you specify. This is helpful if you find you have more cards due for repetition-spaced study than you can deal with; increasing cards' scores increases the interval between repetitions, so using this command, some cards' scores will only be increased by a small amount, or not at all, so they'll still come up very soon, but other cards will have their repetition interval increased by several days or more, so you'll have time to catch up on your other cards before you see them again. Amount lets you actually set what value to reset cards' scores to, or how much to increase / decrease them by, and Unit (only for "increase by" and "decrease by") lets you choose whether to increase / decrease cards' scores by a fixed number of points or by a fixed percentage of their current number of points.
The "Priority" section lets you transform cards' priorities, their pool status for the limit unlearned feature, and whether or not they're forcibly excluded from all flashcard sessions.
Transform priority lets you select what sort of transformation to apply. The 1/2/3/4/5 options reset each card's priority; higher-priority cards come up before lower-priority ones in repetition-spaced tests, and are added to your review pool before lower-priority ones in limit unlearned. "force add pool" and "unset add pool" let you force not-yet-reviewed cards to be included in your limit unlearned pool, or remove that force-include setting if previously applied; once a card has been reviewed at least once, though, it's automatically in your pool and can only be removed with an Exclude command. That command, "force exclude," and the other command to undo it, "unset exclude," prevents cards from ever coming up in a test session regardless of how that session is configured.
Under "Other Statistics," Reset easiness to default resets each card's easiness factor - how quickly its score increases after a correct answer - to the default value of 100. Reset all card statistics resets each card's score / easiness / review history / priority to their default values, so that it's as if it's a brand new card.
Under "Scorefile," Change in scorefile lets you choose which scorefile the above changes will apply to. If you're not using scorefiles, you can safely ignore it. (if you don't change this setting, it'll use whatever your currently-selected flashcard profile uses)
Finally, Export cards under "Other Commands" lets you export the selected cards to a text or XML file, allowing more fine-grained control over which cards you export than the normal Export screen.
Tap on "Search Cards" in the main flashcards screen to bring up this screen:
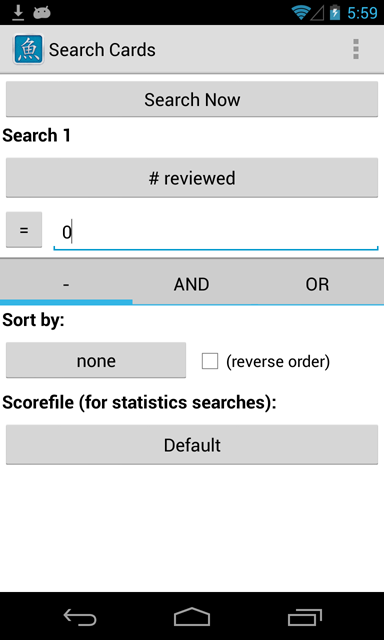
This lets you find flashcards using criteria other than which category they belong to (for which you'd use Organize Cards).
Tap on Search Now to search for flashcards using the selected search criteria - the results will come up in a screen exactly like Organize Cards (but without the New Card / New Category commands), so see that section of the manual for instructions on how to use it.
Below that, you can set up to three different criteria to search for cards with; add additional criteria by choosing AND or OR from the bar below the first search criterion.
The layout of each of those criteria ("Search 1" / 2 / 3) depends on exactly what you're searching for, which you choose via the Search for box:
With some search types, another box will appear right below this which lets you select how Pleco will compare each card's data with the value you're searching for:
There'll then be another box to enter the value below that. Other search types (like categories) include only a list of values and no separate comparison setting.
At the end of each section is a Next box - this selects how the results of this search are combined with the results of the next one. Selecting "AND" will list every card that matches both searches, while selecting "OR" will list every card that matches either search. If you choose "AND" for one search and "OR" for the other, the searches joined together by the "AND" will be grouped together first, so the card would have to match both of the ANDed searches or match the ORed search (algebraically it would be (x AND y) OR z rather than x AND (y OR z)).
Below the search boxes is a Sort by option; this lets you select how the results of the search will be sorted in the Card List. Selecting anything other than "none" here will make searches considerably slower; the score-related options create a particularly big slowdown. Choose the field to sort by from Sort by (the fields are the same as for searches), and check Reverse order if you want the cards to be sorted in descending rather than ascending order.
Finally, the Scorefile selector lets you choose which scorefile data will be drawn from for the score / easiness / review date / # reviewed / # correct / last correct / priority searches. If you're not using scorefiles, you can safely ignore it. (if you don't change this setting, it'll use whatever your currently-selected flashcard profile uses)
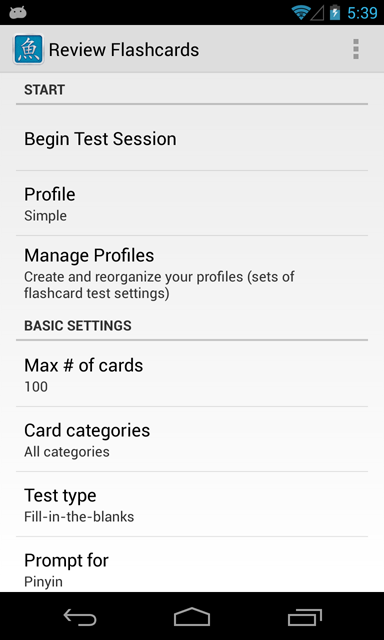
To begin a new flashcard study session, or resume an interrupted one, tap on "Review Flashcards" in the main flashcards screen:
There are a lot of options here, but most of them can be safely ignored until you're comfortable enough to use them.
Begin Test Session starts a new test session with the current settings. (see Test Interface for how to control Pleco during a flashcard test) This is replaced by options to resume or clear a saved session if one is in progress - see Saved Sessions below for more on those.
Profile lets you choose a flashcard test profile, a saved collection of test settings. Whatever changes you make to the other settings on this screen will be saved to the currently-active flashcard profile.
Pleco comes with three different profiles built-in: Simple, which shows you all of the cards in your selected categories each time (in random order); Weighted, which shows cards you need more help with more frequently than cards you remember well, and Spaced Repetition, which shows you each card at a specific interval, increasing the interval each time to help transition the card from your short-term to your long-term memory.
Tap Manage Profiles to create / delete / rename / rearrange profiles.
The next section, "Basic Settings," covers the most essential configuration options for flashcard tests.
Max # of cards sets the maximum number of cards you'd like to study in this session. Select "Endless" to display cards in a never ending loop until you manually end the session; select "All" to display every available flashcard (i.e., every flashcard that matches your Categories / Card Filter / etc settings) exactly once. This option is hidden in repetition-spaced tests, since in order for those to work correctly you need to study all of the cards that are currently due to be tested, though you can exit a repetition-spaced test early (or save it to resume later) if you run out of time.
Tap on Card categories to choose which categories (sets of cards) you'd like to include in the test - see Card categories below for more on the interface for selecting categories.
Test type lets you choose exactly how Pleco will test you on your flashcards; the exact meaning of the Prompt for and Show options that may appear below it varies based on the test type. See Test Types below for more detailed information / screenshots for each type, but briefly:
At present, the Fill-in-the-blanks and Tone Practice modes only work on cards with 4 characters or fewer, and Stroke Order mode only works on single-character cards; other cards will be skipped in these test modes, though you can test yourself on them separately using a Self-graded test and a Card Filter limiting that test to cards with more than 4 characters.
Along with the obvious Char(acter)s, Pinyin, and Defn(Definition) options, and combinations of them, the choices under "Show" also include options for "Audio" if you've purchased one of Pleco's audio pronunciation add-ons. You can listen to audio for any flashcard after it's been revealed / answered, but to play audio before the card is revealed, make sure to pick a Show setting that includes audio.
The remaining options on this screen - Test settings and Card filters in "Basic Settings," and Interface, Card Text, End-of-session, Card selection, and Scoring in "More Settings," are covered in detail below.
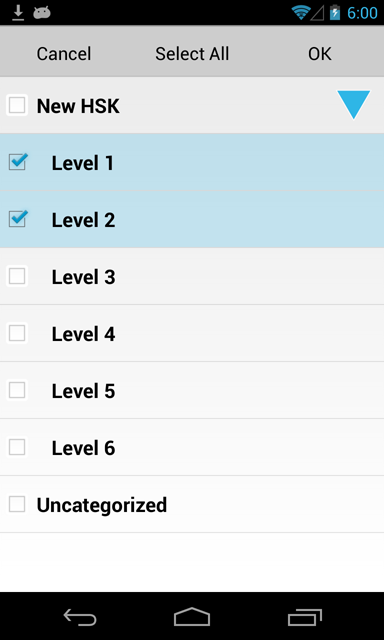
The interface for this screen is quite simple; tap on a category to enable / disable it in a session, or tap on the Select All / None button at the bottom left corner of the screen to enable / disable all categories at once. Tap on the ![]() button at the right of a category to show other categories grouped under it. Tap on OK to save your changes to the category list and return to the Review Flashcards screen, or Cancel to discard changes.
button at the right of a category to show other categories grouped under it. Tap on OK to save your changes to the category list and return to the Review Flashcards screen, or Cancel to discard changes.
Enabling / disabling one category will also enable / disable all of the other categories grouped under it. If a category is enabled, all of the other categories grouped under it will be enabled too, and disabling one of them will also disable the parent category.
The top Subject selection option allows you to configure Pleco to vary which options it uses for "Show" and "Prompt for" - see Subject selection modes below for more on this.
The next few options under "Test Settings" vary depending on which test type you've chosen in "Basic Settings."
Self-graded and Review-only
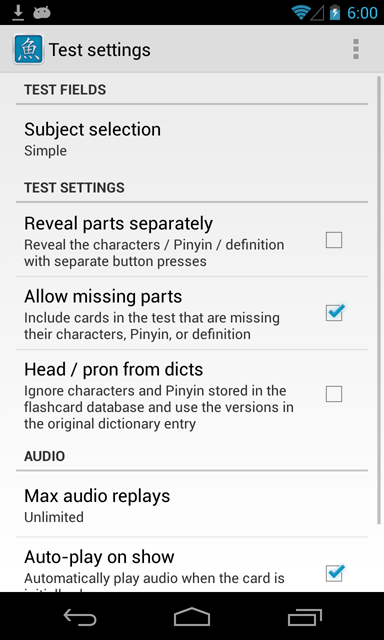
Reveal parts separately causes Pleco to reveal the hidden parts of each Self-graded card separately (one-at-a-time) instead of all at once; see Test Interface below for more on how this works.
Allow missing parts allows cards to appear even if portions of them are missing (e.g. there's no Pinyin or no definition for the card) - enable this if you've imported a long list of cards from a text file and want to be reminded to look up / fill in cards from that list that Pleco doesn't have definitions for.
Head / pron from dicts causes Pleco to get the entire text of each dictionary-based card from the linked dictionary entry, instead of just getting the definition. This is useful if you want to preserve formatting / extra data that's removed by the flashcard system, like the parenthetical (r)s that follow some dictionary headwords.
Multiple-choice
Number of choices selects the number of choices (4 or 5) offered during tests.
Choices from determines where the alternate (incorrect) choices in Multiple-choice tests come from: "All cards" chooses them from all of your flashcards, "Session cats" from cards in the categories in use during the test session, and "Custom cats" from a customized list of card categories - you can configure those categories with the Categories item that appears below "Choices from" when this option is selected.
Confirm choice pops up a confirmation dialog when selecting a definition which lets you see more of its text before confirming / canceling it.
Fill-in-the-blanks
Enable Use builtin input method to use your Android device's built-in keyboard (whatever type of input method that is) in place of Pleco's custom cheating-resistant one.
Enable Score immediately to have answers scored correct / incorrect immediately as soon as you finish inputting them, rather than waiting for you to manually press the "Check answer" button. (this saves time, but prevents you from double-checking your work)
Enable Ignore Pinyin tones to mark Pinyin inputs as correct even if their tones are missing or don't match those on the card. (not recommended for long-term use, since correct tones are essential for learning Chinese)
With Only score if filled enabled, the system will refuse to score an answer correct or incorrect until all of the spaces have been filled (tapping on the "Check answer" button before then will do nothing). This is useful if you have a tendency to accidentally hit the Answer button before you've finished filling in all of the blanks.
The Only score if filled option also applies to "Stroke order" tests, and both it and Score immediately apply to "Tone Practice" ones.
Stroke Order
Correct stroke color / Incorrect stroke color: change the colors of correct / incorrect strokes in stroke order tests, useful for users suffering red-green color-blindness or who simply don't like our default color options.
Finally, the "Audio" section configures how audio playback is handled in audio-enabled flashcard tests.
Max replays and Auto-play on show only apply to tests in which Audio is one of the "Show" fields. Max replays chooses the maximum number of times you can listen to the audio recording for a particular card before the system cuts you off, useful for practicing your quick listening skills. Auto-play on show causes Pleco to play the audio for a card immediately after it appears, rather than making you manually tap on the audio button to play it.
Auto-play audio on reveal causes Pleco to automatically play the audio for every card when it's revealed, regardless of whether or not you're in a test where Audio is one of the "Show" fields.
The "Card filters" screen lets you restrict the cards shown in a particular flashcard session by additional criteria besides those in the Card categories and Card selection screens. It's useful for testing yourself on just a particular group of cards, cards you recently answered incorrectly or cards tested after a certain date or cards with more than a certain number of characters. It also provides additional category filtering options, so that you can require that all cards in a test belong to a specific category in addition to those chosen in "Card categories," (if you want to, say, test on cards that belong to a particular textbook chapter AND are on the HSK test), or exclude cards that belong to a specific category.
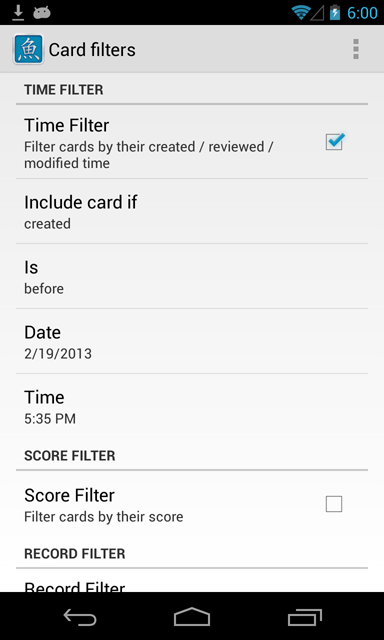
Time Filter lets you require that cards be created / reviewed within a specific time range. From Include card if, choose "created" from the first popup list to filter by the time they were created, "modified" to filter by the time they were modified (text was changed or they were added to / removed from a category), "first reviewed" to filter by the time they were first used in a flashcard test, and "last reviewed" to filter by the time they were most recently tested.
From the next Is list, choose "before" or "after" from the second popup list to require that cards have been created/reviewed before or after a set time; tap on the time boxes to select that time. Choose "within" or "not within" to require that cards be created/reviewed within (or not within) some range from the current time. This is helpful if you don't want to have to keep going back and reconfiguring the "Card filters" screen each time you begin a new session; for example, if you want to test yourself on cards created within the past week, just set the card filter to "created" "within" 1 "weeks" and you'll never need to configure it again.
With "before" or "after" time filters, tap on Date and Time to configure the date and time to compare against. With "within" and "not within," enter a number in Amount and choose a unit of time that number counts in Unit. You can choose between absolute time units ("days," "weeks," "months") and calendar time units ("cal days," "cal weeks," "cal months") - the absolute units use exactly the specified amount of time, i.e. 1 day = 24 hours, 1 week = 168 hours, etc, while the calendar units count from the start of the day / week / month; if it's February 14th and you set the filter to "within" 1 "cal months," it'll look for cards created/reviewed/etc since midnight on February 1st, while "within" 2 "cal months" would look for cards created/reviewed since midnight on January 1st.
Enable Score filter to require that cards' scores fall within the specified range; enter the minimum score in Range start and the maximum score in Range end. Set the minimum score to 0 if you only want to restrict the maximum score, or set the maximum score to 0 if you only want to restrict the minimum score.
Enable Record filter to require that cards have been reviewed or answered correctly / incorrectly a total of a certain number of times. Include card if chooses whether you're looking for the number of times the card was reviewed / answered correctly / answered incorrectly, Is lets you choose the type of comparison (">" for "more than," "<" for "less than" or "=" for "exactly"), and Than chooses the number of reviews or answers to compare against.
Enable History filter to require that cards have been answered correctly / incorrectly a certain number of times in a row. Include card if here chooses whether you're checking for times answered correctly / incorrectly - "correct in row" means the card has been answered correctly # times in a row, "incorrect row" means the card has been answered incorrectly # times, "not correct in row" means the card has not been answered correctly # times in a row (i.e., it may have been answered correctly some of those times, but not all), and "not incorrect in row" does the same for incorrect answers. Is >= chooses the # of times to compare against.
Length filter requires that card headwords be a certain number of characters / syllables in length. As with "Score filter," Range start and Range end set the minimum / maximum length, and each value is ignored if it's set to 0.
Finally, the Category Filter options allow you to impose an extra set of category restrictions along with the ones in the Card categories screen; you can require that cards belong / not belong to some specific category in addition to belonging to at least one of the categories selected in "Card categories." From Filter, choose "require" to require that the cards *do* belong to the specified category, or "exclude" to require that they *don't* belong to the specified category, then choose the category to filter on from Category.
The "Subject selection" options under Test Settings allow you to vary which parts of each card ("Show" / "Prompt for") Pleco tests you on within a session; i.e., some cards will be tested on one part and other cards will be tested on a different part.
The default "Simple" option turns this feature off - you're tested on the exact same thing with every card.
With "Alternating" subject selection, you can pick three different sets of settings for "Show" and "Prompt for" - one for "Reading," one for "Writing," and one for "Listening." After enabling "Alternating" subject selection, the main Review Flashcards screen will change to look like this:
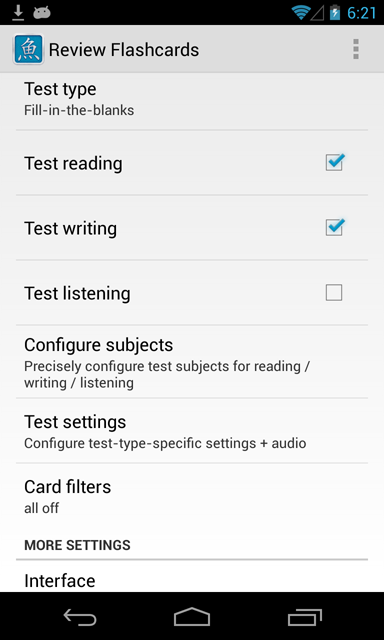
Enable Test reading / Test writing / Test listening with the three boxes on this screen, and configure them via Configure subjects (which lets you choose the "Show" and "Prompt for" settings for each type). During a test, Pleco will rotate between the test types you've enabled for that test - if all three are selected, the first card is tested on the "reading" fields, the next card on "writing," and so on.
With "Score-based" subject selection, the "Show" and "Prompt for" settings vary based on each card's score - this is an extremely powerful option since it allows you to take cards through an orderly progression of test types. You can, for example, start off testing a brand new card on something simple (say, showing the characters / Pinyin and just trying to remember the definition), and then, as the score increases, make the test a bit more complicated - show the definition and recall the characters, say.
Enabling "Score-based" subject selection replaces "Show" and "Prompt for" with a single "Configure score fields" option; tap on that to bring up this screen:
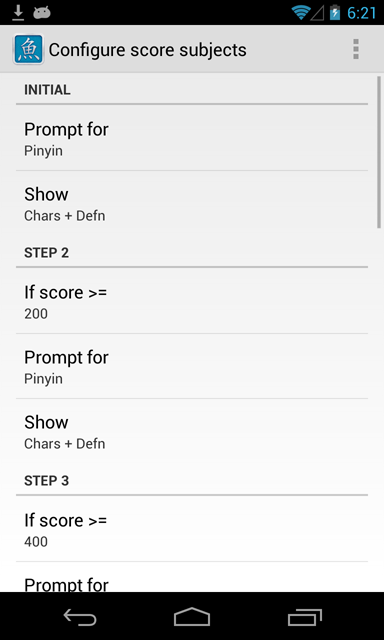
Here, you can configure the Prompt for and Show values for each score range, and set the score threshold at which each successive range starts with If Score >=.
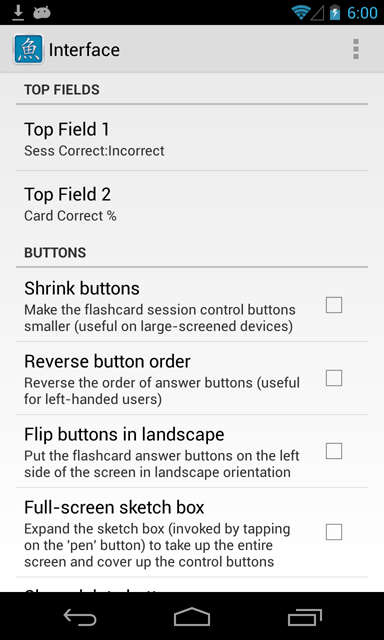
This screen lets you configure settings related to the display / arrangement of the user interface during the flashcard test. As with other settings, these apply only to the current flashcard profile; they don't carry over to other profiles.
The Top Fields options select which extra information will be displayed at the top of the flashcard test screen:
Under "Buttons," Shrink buttons makes the buttons shorter (so there's more space available for the actual flashcard), Reverse button order flips the order of the correct / incorrect / etc buttons that appear in the flashcard test interface; useful if you're left-handed or if you just don't like the way we arranged them. Flip buttons in landscape puts those buttons on the left side of the screen in landscape (wide) orientation, also useful for left-handed users.
Full-screen sketch box makes the drawing practice box (accessed by tapping on the paintbrush icon at the top right corner of the screen) take up the entire screen; otherwise, it'll avoid covering the answer buttons so that you can keep advancing through flashcards without having to hide / show it.
Show delete button adds a button to the test interface's Edit tab to delete the currently-displayed flashcard.
Category button default lets you specify a category which the Category button in that Edit tab will add / remove the currently displayed card to when you tap on it; with "None" it will simply display a list of categories to add / remove the card to / from.
Score button action lets you configure what happens when you tap on the Score button in the Edit tab - "set" changes the card's score to a set number of points, "increase" increases it by a set number of points or percentage, and "decrease" decreases it by a set number of points or percentage. Amount chooses the number of points / percentage, and Unit chooses between points and percentage for "increase" / "decrease."
Back tab immediately causes Pleco to immediately go back to the previous card when you tap on the Back tab button, saving an extra screen tap.
Don't prompt undo score prevents Pleco from prompting you for a new card score when you tap on the Undo button in the Back tab, again saving an extra screen tap if you don't want to assign those cards new scores.
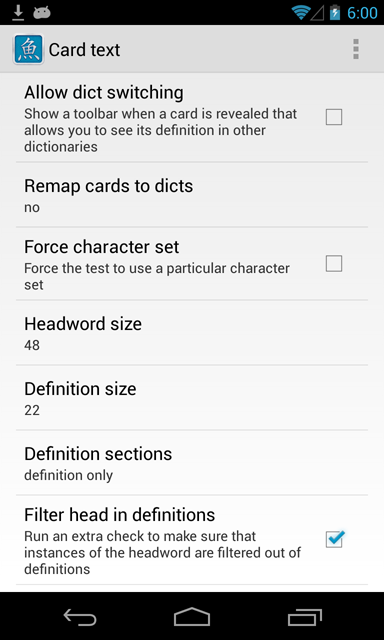
This screen lets you configure settings related to rendering of dictionary entries during the flashcard test. As with other settings, these apply only to the current flashcard profile; they don't carry over to other profiles.
Allow dict switching adds an extra toolbar at the side / bottom of the screen when a card is revealed, allowing you to instantly view the same word in other dictionaries or even permanently remap that card to use a different dictionary's entry. (tap on the dictionary icon to switch dictionaries, the undo arrow button to return to the original entry or the ![]() icon to permanently remap the card to your newly selected entry)
icon to permanently remap the card to your newly selected entry)
The very powerful Remap cards to dicts option takes this one step further and lets you automatically which dictionaries cards draw their definitions from during the test. This is particularly useful during multiple-choice tests, where you may want a dictionary with shorter definitions, and during fill-in-the-blanks tests, where the definition in some dictionaries (Tuttle, e.g.) may give away the characters in the headword (or parts of them). Set it to "no" to disable this feature, or "yes" to enable it and use it exclusively - even custom cards will be remapped, and any card that can't be remapped will be skipped. "custom first" keeps the definitions in any custom cards but remaps others, and "custom last" tries to remap everything but uses custom card definitions if those cards can't be remapped.
The Dicts selector that appears below "Remap cards" lets you choose which dictionaries cards will be remapped to - drag a dictionary from below the "Drag dictionaries below this line to exclude them" item to exclude them from remapping, or vice versa to include them, and change their priority order by dragging them up and down in the space above that line. Pleco will try to remap a card to each dictionary in that list in order, stopping as soon as it finds an entry in a dictionary that matches the card's characters and Pinyin. If the dictionary the card normally links to is in the list, it'll stop as soon as it hits that, otherwise, if it can't remap the card to any dictionary, it'll skip over it (excluding it from the test entirely unless it has a custom definition and you've chosen "custom first" or "custom last" above).
Enable Force character set to specify which character set (simplified or traditional) will be for card display; with this option disabled, the system will use whichever character set is currently selected in the main dictionary screen. Under Character set, "Simplified" and "Traditional" use those character sets, but include the other character set in brackets if it's configured to show up that way in the main dictionary; "Simp-only" and "Trad-only" don't show the other character set in brackets even if it's visible in the main dictionary.
Headword size and Definition size choose the font sizes for characters in dictionary headwords and definitions. These values are reset when restoring a flashcard database via the Restore Database function, so if you've customized them you'll have to go in and configure them again after restoring a flashcard database from a backup (or transferring it from another platform).
Definition sections lets you select exactly which parts of each dictionary definition are visible during sessions; this feature currently only works with entries in the ABC and PLC dictionaries. "Show All" shows the entire definition; "No Xrefs" shows everything except for the "See Also" links to other dictionary entries, and "Defn Only" hides both those and example sentences, so that you see only the definition and nothing else - this is useful if you want to keep definitions short and easy to read through quickly, or if you want to make sure you aren't accidentally given any hints to the card's characters / pronunciation from the example sentences.
Enable Filter head in definitions (normally on by default) and during a test in which the headword / pronunciation of a flashcard are hidden, Pleco will attempt to filter them out of the card's definition to avoid accidentally "cheating" by having them given away. This is mainly useful in some dictionaries like Tuttle that frequently repeat headwords in their definitions.
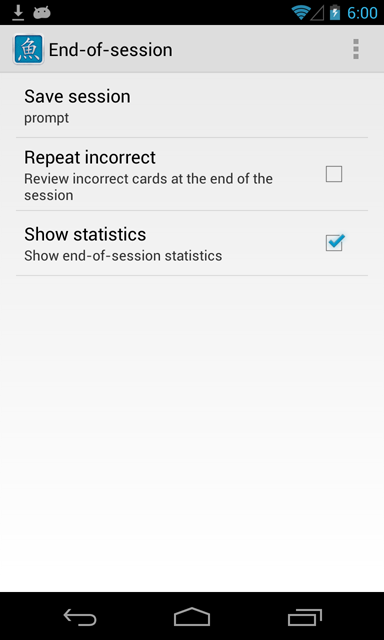
This screen lets you configure settings related to operations that you can at the end of a flashcard test. As with other settings, these apply only to the current flashcard profile; they don't carry over to other profiles.
Save session configures Pleco's behavior when you exit a flashcard test by tapping on the Exit button at the top left corner of the screen. (sessions are always saved if you quit Pleco / leave it to answer a phone call) "prompt" has Pleco bring up a prompt each time asking if you'd like to save the test session to resume later, "always save" saves it automatically without a prompt, and "never save" doesn't save it at all.
Repeat incorrect lets you configure Pleco to re-test you on cards you answered incorrectly after you finish a test session. Loop causes Pleco to keep repeating these cards until you've answered them all correctly (so once you answer a card correctly, it no longer shows that card in successive loops), and Shuffle causes it to randomize the order of cards (instead of showing them in the same order you originally reviewed them in).
Show statistics displays a statistical summary (number of cards correct / incorrect, elapsed time, and average score) at the end of each test session.
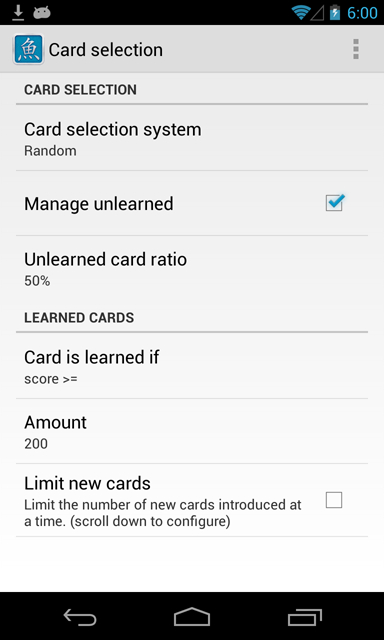
This screen contains some rather-complicated options for configuring how Pleco chooses which cards to present to you in each flashcard test. You can get most of the benefits of both this and the "Scoring" screen with the pre-configured Profiles (Simple / Weighted / Spaced Repetition), so there's not much need to fiddle around with the settings here unless you really want to.
Under the top "Card Selection" section, the Card selection system option sets out the basic method Pleco uses to choose which cards to show you during a flashcard session. Each Card Selection mode has one or more additional options that display below it when enabled.
Under "Learned Cards," Card is learned if configures what criteria Pleco uses to decide whether or not a card is "learned." This affects a number of different areas - the "Unlearned ratio" option for "Random" card selection above, the count of learned cards in the Statistics screen, the "Cushion unlearned" option in Scoring / Tweak parameters, and, most importantly, the "limit # of unlearned" feature below. Choose "score >=" to require that the card's score be greater than or equal to a certain number of points, "correct in total" to require that a card be answered correctly a certain number of times in total, or "correct in row" to require that it be answered correctly a certain number of times in a row. Amount lets you choose the score threshold or number of times used by that setting.
Limit new cards is a very useful option that lets you limit the pool of non-"learned" cards to a finite number; this keeps you from being overwhelmed by more new words than you can manage at a time, so if you add 8000 new flashcards to your database you won't suddenly be expected to start memorizing all 8000 at the same time. You simply set a threshold at which a card is considered "learned" and then Pleco will try to keep the number of un-"learned" cards that you're studying at any given time below a certain number.
Once you've reviewed a card, even once, it'll be part of your pool of cards to study, so if you're already working on more than the specified number of "unlearned" cards before you enable this option, it won't take any away, but it won't introduce any new ones until you've learned enough of them to drop the un-"learned" count below the level you set.
Limit by lets you choose whether to limit the overall number of them ("maximum unlearned") or the number of them introduced per day ("new per day").
Set the maximum number of unlearned cards in the box next to To.
The Prioritize by option determines how Pleco chooses new cards to introduce when you have fewer than the requested number of unlearned cards - "random" will choose them randomly from all eligible cards, "created" will choose them by the exact order in which they were created, and "approx created" does almost the same thing but will randomly choose between cards created within a day of each other; this is useful if you've imported a long vocabulary list that happens to be alphabetically ordered (so that cards later in the alphabet would have been "created" a few seconds after earlier cards) and don't want to actually study cards in that exact order (so you don't have to get through all the 'a's before you can start with the 'b's, and so on) Card priority settings supersede this option, though - higher-priority cards will always be added to your pool of cards to study before lower-priority ones.
Note that with the "score >=" and "correct in row" options for "Card is learned if," it is possible for a card to become un-"learned" again after it's already been "learned" - this is useful if you stop / cut back on your Chinese studies for a while, since it'll help ensure that you aren't presented with too many new vocabulary words until you've re-learned any words you've forgotten.

The options in this screen are even more complicated / arcane than those in "Card Selection," and again you can get most of the benefits of this with the pre-configured Profiles (Simple / Weighted / Spaced Repetition), so there's really not much need to fiddle around with the settings here unless you really want to.
Tap on Scorefile to choose the scorefile for this flashcard test - scores from this scorefile will be used to determine how often cards come up during the test, and the scores in it will be updated based on results of the test (whether you remembered each card correctly or incorrectly). As with other profile/scorefile-related options, you can safely ignore this option if you don't want to deal with multiple profiles / scorefiles. Tap on Manage Scorefiles to create / delete / rename / reorganize your scorefiles on the Manage Scorefiles screen.
Under "Scoring Options," Scoring system selects the way in which flashcard scores are adjusted based on your correct/incorrect answers:
The remaining options vary depending on which "Scoring system" you've selected:
Automatic
Tweak Parameters opens a separate screen (see below) to fine-tune the scoring algorithm.
If review early, only visible with "Repetition-spaced" selected as your Card selection system, lets you specify how scores should be changed on cards that are reviewed ahead of schedule (reviewing them in the optional not-yet-due cards review) and answered correctly. The default "don't change" is probably best in most cases - this will preserve the score exactly as is, so the interval between repetitions won't be altered, which is appropriate since you haven't proven you're ready for a longer interval yet. "change normally" increases the score exactly as the system would if you studied on time, "scale linearly" scales the score increase linearly by the time interval (so if a card was set to repeat in 6 days and you reviewed it after 3, you'd get 50% of the score increase), and "scale exponentially" squares that factor to make it smaller (so a card with a 6 day interval reviewed after 3 days would have its score increased by (50% * 50%) = 25% of the full amount).
If review late works largely the same way, but "exponentially" is replaced by "logarithmically" since we're dealing with factors larger than 100%. With "scale logarithmically," if a 6-day card is only finally reviewed again after 12 days, instead of being scaled by 2x the score increase would be scaled by the square root of that (1.41x).
Enable Prompt for quality to show an additional prompt after you answer a card correctly or incorrectly, asking you to rate how well you remembered it. After each answer, Pleco will show a prompt asking you to rate the card from 1-3 for an incorrect answer or 4-6 for a correct one. A higher value means you remembered it better, so you'd enter 3 for an incorrect answer which you almost remembered / only remembered a little bit incorrectly, and you'd enter 4 for a correct answer which you had a very difficult time remembering (or took a lucky guess on). This is then factored into the scoring algorithm.
The Button layout option below "Prompt for quality" lets you select a precise order in which the quality-prompt buttons will appear. The options with a / in them mean that a different set of buttons will show up depending on whether you answered the card correctly or incorrectly (so for example, 321 / 456 would have the buttons for scores of 3, 2, and 1 appear in that order on an incorrect answer, and the buttons for scores of 4, 5, and 6 appear in that order on a correct answer). The options without a / display all 6 choices for each answer, regardless of whether you answered correctly or incorrectly; this is particularly useful in multi-choice tests (where if you have no clue about the answer and happen to hit the correct choice you can penalize yourself as if you hadn't known the card) and fill-in-the-blanks tests (where you can credit yourself for a correct answer if you, say, accidentally misspelled a Pinyin syllable but know you were thinking of the correct one). "(alternating)" displays all 6 buttons in the order 654321 on a correct answer or 123456 on an incorrect answer.
Enable Only change 1x per day to prevent a card's score from being increased/decreased more than once per day, regardless of how many times you're tested on it. This prevents the score from changing more than once in the same direction; if you remember a card correctly but then remember it incorrectly later on that same day, the score would still decrease based on that incorrect answer, and if you after that you test it a third time and remember it correctly the score would again increase; however, if you answer it correctly twice in a row, the score won't increase again the second time. This helps to ensure that intense periods of studying (say, cramming before a big exam) won't distort your scores too much, so we strongly recommend leaving it enabled. The Day type and Day start time options below this work exactly the same as in the repetition-spaced settings.
Old Automatic
Aggressiveness selects how aggressively scores for each card are increased after you answer them correctly. A higher aggressiveness setting means larger score increases. The aggressiveness setting can range from 1 to 6: 3 is the default in Pleco, 5 roughly corresponds to the aggressiveness used by SuperMemo and Mnemosyne, Anki is somewhere in the middle but is more accurately approximated by the regular "Automatic" scoring system.
Easiness scaling lets you tweak the scoring algorithm to better fit some learning strategies. "None" keeps the default algorithm, "First Increase" weights the score increase after a card is first answered correctly by its easiness factor, and "All Decreases" weights the amount the card's score is decreased after an incorrect answer by its easiness factor (rather than simply resetting the score to its default value of 100). The default "None" setting should work best for most people, so if you don't want to delve into the mathematics of this it's probably best to just stick with that.
The Button layout and Only change 1x options under this work exactly the same as in "Automatic" above.
Manual
Configure Scoring opens a separate screen (see below) to configure how you want scores to increase or decrease.
The Only change 1x options under this work exactly the same as in "Automatic" above.
Easiness change: the amount by which the card's easiness factor is increased / decreased for a correct / incorrect answer or, with "prompt for quality" enabled, an answer quality of 1/2/3/4/5/6.
Initial correct score: the minimum score of a card after a correct answer; i.e., the score it's first set to after you answer it correctly. This can be set separately for an answer quality of 4/5/6 with "prompt for quality" enabled.
Correct scale score increase %: only really interesting with "prompt for quality" enabled, this lets you multiply the amount by which a card's score will be increased after a correct answer by a set percentage based on the answer quality (4/5/6); it's a multiplication, so 90% would mean that whatever score boost the algorithm generated would be multiplied by .9.
Incorrect score decrease %: this lets you configure a percent change applied to a card's score after an incorrect answer; the default 0 will just drop it to the minimum score (configured below), but if you prefer to scale it rather than reduce it altogether you can do that using this option. As above, this is a multiplication applied to the score; if the score is 1000 and the percentage you've set is 20 then the score would be 200 after a wrong answer. As with the other options, it can be customized based on the answer quality (1/2/3 for an incorrect answer).
Under "Score Limits," Minimum score sets the minium score value for a card and Maximum score the maximum.
Likewise, under "Easiness," Minimum easiness sets the minimum easiness factor and Maximum easiness the maximum.
Easiness divisor is used in the formula for calculating a new card score after a correct answer. The card's easiness factor (which defaults to 100) is divided by this amount, then multiplied by the card's score to get the new card score. This is an easy way to quickly make the algorithm more aggressive (by lowering this value) or less aggressive (by raising it) in how quickly it increases cards' scores.
Cushion unlearned: with this option enabled, if a card is "unlearned" (however you've defined that in "Card Selection,"), the easiness factor will not be decreased again if you answer it incorrectly more than once in a row, reducing the likelihood of a brand new card being stuck in "easiness hell" with an extremely low rate of score increase.
Enable Increase to raise the score after a correct answer, and Decrease to lower it after an incorrect one. Increase and Decrease each have the same set of options:
The first row of options lets you choose how the score changes; select "by" from the first list to increase/decrease the score by a specified amount, or "to" to set it to a fixed value. With "to," enter that value in the Amount field; card scores will be set to that specific value when the card is answered correctly/incorrectly. With "by," enter the amount to change the score by, then choose "points" in Unit to add/subtract that number of points from the current score or "%" to add/subtract that percentage of the current score. (so if a card with a score of 100 was set to Raise "by" 30 "%," its score would increase to 130).
The second row of options determine when the score changes. The first list selects how many times the card must be answered correctly/incorrectly before each change; "1" would mean it's changed after every correct/incorrect answer. Type determines how close together those results need to be:
Finally, the Score limits option lets you configure a minimum score for cards; a card's score won't be reduced below this even if you continue remembering it incorrectly. We recommend setting the minimum to 100, since that's the default score for newly-created cards (and thus ensures that cards that you've remembered incorrectly won't come up more often than cards you've never even been tested on before).
When you exit a flashcard test session before it's finished, by default you'll be shown a prompt asking if you want to save the session to resume later; tap Yes to save the session, No to discard it, or Cancel to not exit the session at all. Sessions are also automatically saved if you exit Pleco (or are interrupted by an alarm / phone call) with one in progress.
To resume a saved session, tap on "Review Flashcards" in the main flashcards screen and you'll see the usual settings replaced by Resume Saved Session and Clear Saved Session. Tap on Resume to continue testing, or Clear to discard the saved session and start configuring a new test session. Changes to card scores / statistics already made during the session will still be preserved even if the session is discarded.
After opening the Review Flashcards screen and configuring your flashcard test, tap on Begin Test Session to bring up this screen:
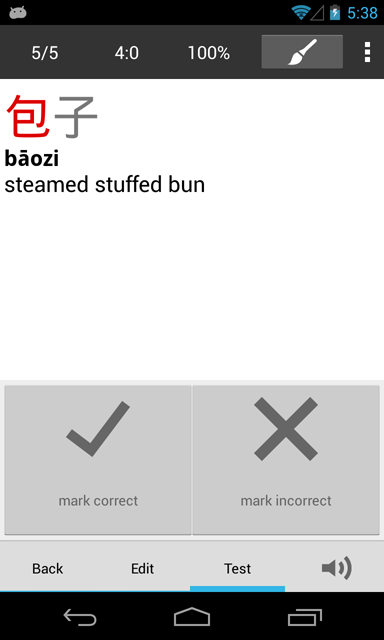
This is where you actually study your flashcards. The screen changes a bit for each test type, but the basic layout is common to all flashcard tests.
Top Bar: (from left to right)
Bottom Bar: (from left to right)
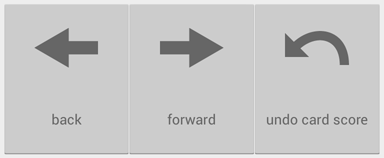
The Back button goes back to the previously reviewed card in the session; you can go back up to 1000 cards. After you tap on the Back button, a Forward button will appear (replacing "Skip Card") allowing you to move forward again in the card history. Tap on the Test Tab to immediately return to the current card.
Undo card score, only enabled once you've backtracked to a previous card with "Back," reverses any change made to the card's score, easiness factor, or last reviewed date when you tested yourself on it.
Skip Card, which replaces "undo" when you're still in your original card and haven't answered it yet, skips the current flashcard and advances to the next one without changing its score or updating its review time; it also prevents the card from coming up again in a frequency-adjusted test (or one with "number of cards" set to "Endless").
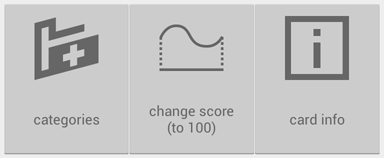
The categories button pops up a list of the categories the card is currently in and the other top-level categories in your flashcard system; tap on one of the categories it's in (under "Current Cats") to remove it from that category, or on one of the categories it isn't in (under "Avail Cats") to add it to that category.
If you've chosen a specific category for this button in Commands, the button name will change to "Add to" or "Remove from" that category, and its icon will change to a + or -, depending on whether or not it's already in that category. (this is a convenient way to add cards to an extra category like, say, "needs extra review" or "really hard"). Simply tapping on the button will add / remove it from the category in that case, while tapping-and-holding on the button will bring up the same list as "Toggle categories."
The Change score button's behavior depends on how it's configured in Commands - by default it simply resets the card's score to the same value (100) as a brand new card. Tap-and-hold on this button for some additional score change options: you can change the score to 2x, 4x, 1/2, 1/4, or 1/10 of its current value, and there's also an "Ignore Answer" option in that menu which leaves the score unchanged but overrides an incorrect answer (like "Undo card score" for a card you haven't finished with yet), and a "Reset Stats" command to reset all of a card's statistics (score, easiness factor, priority, last reviewed date, history, etc) to their default values.
The Card info button brings up the standard Card Info screen for the current card; it's only accessible once the card has been revealed / answered (since it would give the answer away otherwise).
You can add an optional fourth Delete card button to this tab through Commands - this permanently deletes the current flashcard from your database.
Review Only
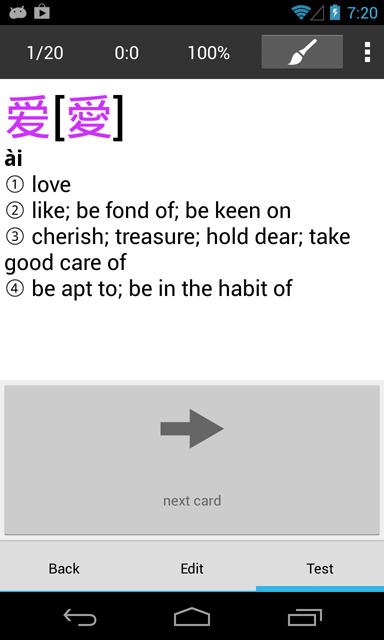
A Review Only session lets you quickly look through your flashcards without doing any testing at all. After you finish viewing each card, simply tap on the Next card button to advance to the next one.
Self-graded
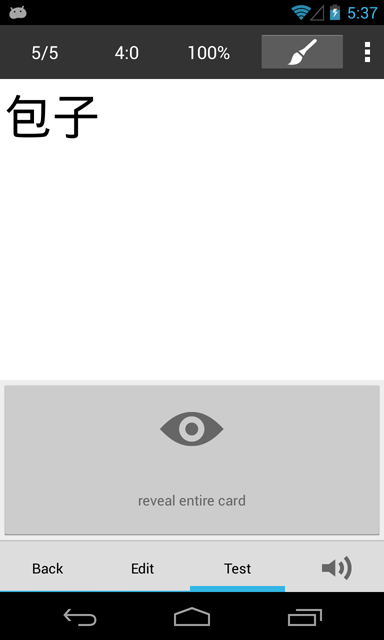
In a Self-graded test, the text of each card is shown with some parts missing; the missing parts are revealed after you tap on the Reveal button. This allows you to look at a card, try to remember the missing parts, then check to see if you remembered them correctly, much like flipping over a printed flashcard.
After revealing a card, tap on the Correct or Incorrect button to indicate whether you remembered it correctly or incorrectly - Pleco will record this and factor it in to the card's score. Tapping Correct or Incorrect will immediately advance you to the next card, unless you've enabled "Prompt for quality" in Scoring as described below.
If you've set your "Scoring type" in Scoring to "None," the Correct/Incorrect buttons will be replaced by a simple Next button - tap on that button to move on to the next card.
If you've enabled the "Reveal parts separately" option in Test Settings, along with the one Reveal button you'll also see separate Reveal Headword, Reveal Pron(unciation) and/or Reveal Definition buttons; tap on one of these to reveal just that part of the card, while the other hidden parts remain hidden.
If you've the "Prompt for answer quality" option in the Scoring settings screen, after you tap the Correct/Incorrect button you'll be shown a choice of scores - don't know (1), forgotten (2), and almost remembered (3) for an incorrect answer, or barely remembered (4), remembered (5), and remembered perfectly (6) for a correct one. A higher value means you remembered the card better; tap on the score to record it and advance to the next card.
If you find that the headword / pronunciation for a card are often given away in the definition before they're revealed, enable "Filter head in defns" under Card Text and Pleco will attempt to filter them out for you. (this is normally on by default, but may be turned off for users with flashcard databases transferred from old versions of Pleco)
Multiple-choice
In a Multiple-choice test, the text of each card is shown with some parts missing and you're prompted to select the missing parts from a list of choices.
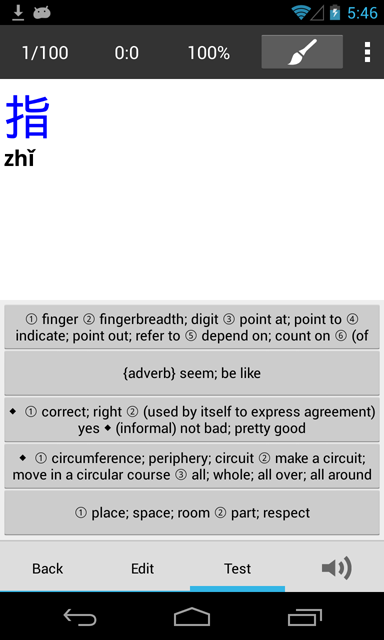
Tap on the matching headword / pronunciation / definition in the Answer Bar to select it.
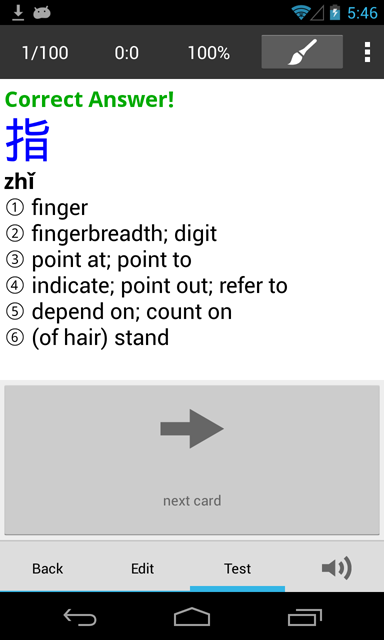
After making your selection, you'll see Correct answer at the top of the card text if you chose the correct choice, or Incorrect answer, your chosen answer, and then Correct answer if you chose an incorrect one.
After reviewing the results, tap on the Next button to move on to the next card.
If you've enabled the "Prompt for answer quality" option in the Scoring settings screen, instead of the Next button you'll be given a choice of scores - don't know (1), forgotten (2), and almost remembered (3) for an incorrect answer, or barely remembered (4), remembered (5), and remembered perfectly (6) for a correct one. A higher value means you remembered the card better; tap on the score to record it and advance to the next card.
If you enable "Confirm choice" in Test Settings, when prompted to select a definition in the Answer Bar, after tapping on an option you'll see a dialog pop up with a larger / scrollable version of it which you can read through to double-check if it's the correct definition and confirm / cancel your selection.
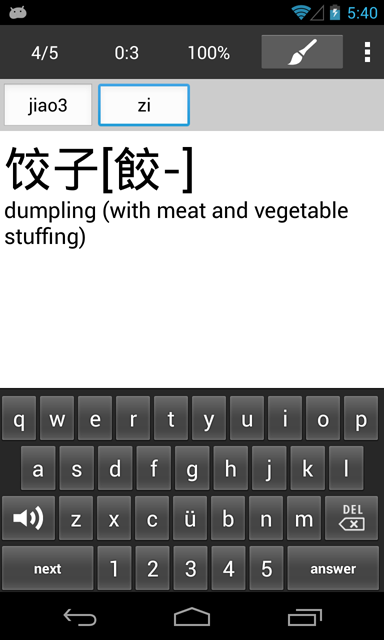
In a Fill-in-the-blanks test, the text of each card is shown with the headword or Pinyin pronunciation missing and you're prompted to enter the text of the missing part. Currently, only words with 4 or fewer characters/syllables are supported. An Answer Box will appear for each character/syllable in the word; the Answer Box that's currently accepting input will be shown with a highlight around it. Tap on another Answer Box to select it.
On a test where you're supplying the pronunciation (as shown above), simply type in the Pinyin using the onscreen keyboard. We give you a default keyboard that makes it easy to input tone numbers (they also conveniently advance you to the next Answer Box) and play audio, but if you don't like our keyboard you can turn on the "Use builtin input method" option in Test Settings to use your default Android one.
On a test where you're supplying the headword, you'll be given a handwriting recognizer interface just like the one in the regular dictionary, but with a transparent background so that you can see the card's Pinyin / definition underneath it:
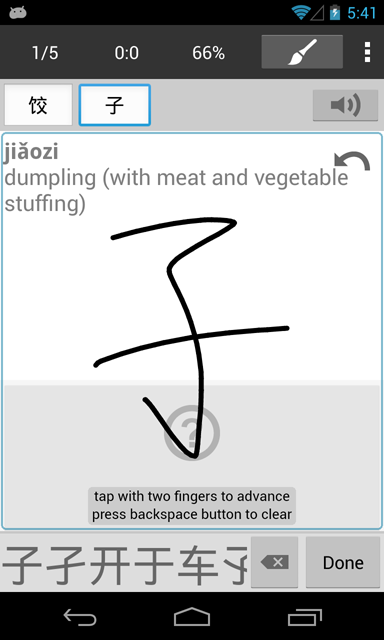
Draw the character in the box, then tap on one of the character choices at the bottom of the screen, or keep the first character choice by tapping on the screen with two fingers; either way the selection will then move to the next Answer Box. Tap on the Backspace ![]() button to clear the current character and not advance to the next Answer Box, allowing you to try drawing the same character again.
button to clear the current character and not advance to the next Answer Box, allowing you to try drawing the same character again.
If you've enabled "Score immediately" in Test Settings, your answer will be checked as soon as you finish entering it; otherwise, tap on the answer or Check answer button to check it. If you've enabled "Only score if filled" in Test Settings, even tapping on that button won't check your answer until all visible Answer Boxes have been completed.
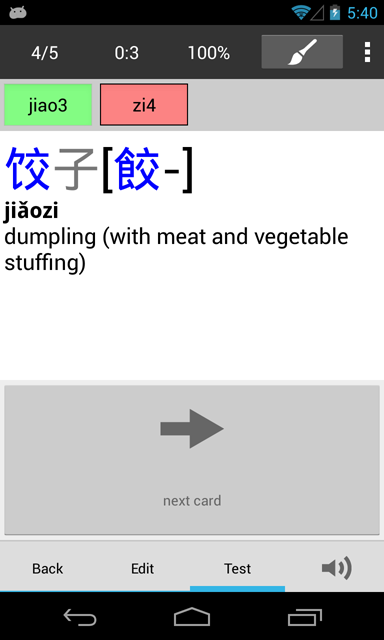
Incorrect answers will have their Answer Boxes drawn with a red background and a thick black border; correct answers will have their Answer Boxes drawn with a green background and a normal shadowed border. After reviewing the results, tap on the Next card button to move on to the next card.
If you've enabled the "Prompt for answer quality" option in the Scoring settings screen, instead of the Next button you'll be given a choice of scores - don't know (1), forgotten (2), and almost remembered (3) for an incorrect answer, or barely remembered (4), remembered (5), and remembered perfectly (6) for a correct one. A higher value means you remembered the card better; tap on the score to record it and advance to the next card.
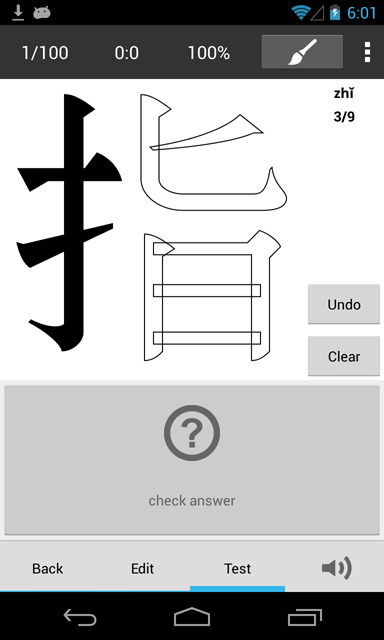
In a Stroke Order test, you're shown the outline of a Chinese character and prompted to tap on the character's strokes in the correct order. Note that this will only test single-character flashcards; it ignores multi-character cards altogether.
Tap on the strokes in the box on the left side of the screen in the correct order. To help you make sure you select the correct stroke, when you hold down your finger on the screen, the stroke you're about to select will be highlighted in blue; drag your finger around until the correct stroke is selected, then release it to record the stroke. If you make a mistake, tap on the Undo button to remove the last stroke entered, or the Clear button to start over from the first stroke.
(this worked great on Palm OS and Windows Mobile, which use styluses instead of fingertips for pointing at things, but we realize it's a pretty awkward interface on modern smartphones (though it works great on tablets) - we're working on a better stroke order testing system for a future Pleco update, but we figured this would be better than nothing in the meantime)
Once you've finished entering the stroke order, tap on the Check answer button to check it. (this will happen automatically if you've enabled "Score immediately" in Test Settings)
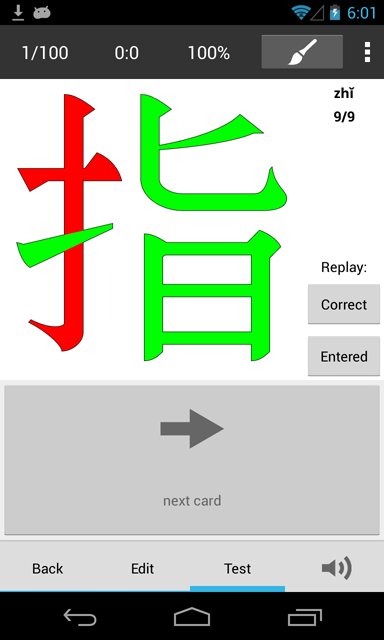
Strokes that you entered at the correct point in the order will be shown in green, while strokes that you entered incorrectly will be shown in red. Tap on the Correct button to draw the card's strokes one-by-one in the correct order, or the Entered button to draw them in the order in which you entered them. After reviewing the results, tap on the Next button to move on to the next card.
If you've enabled the "Prompt for answer quality" option in the Scoring settings screen, instead of the Next button you'll be given a choice of scores - don't know (1), forgotten (2), and almost remembered (3) for an incorrect answer, or barely remembered (4), remembered (5), and remembered perfectly (6) for a correct one. A higher value means you remembered the card better; tap on the score to record it and advance to the next card.
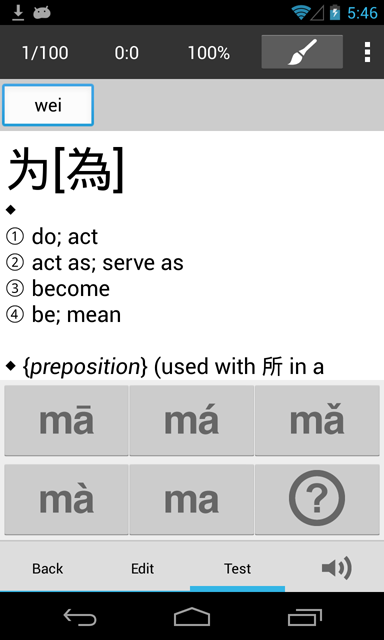
In a Tone Practice test, you're shown the full text of a flashcard but with the tones missing from the Pinyin pronunciation, and prompted to enter the correct tones.
The interface for this is exactly the same as for a Fill-in-the-blanks pronunciation test, except that instead of a keyboard you're given just six buttons; one for each tone, plus a sixth Check answer button. (we use "ma" because it's the most common word used to teach students how tones work, but it has nothing to do with what you're entering in the test - only the tone mark matters) Tap on the appropriate tone to enter that in the currently-selected Answer Box, or to change the tone that's already in that box. If you've enabled "Score immediately" in Test Settings, your answers will be checked as soon as you finish entering them; otherwise, tap on the bottom-right "check answer" button to check them.
Tap on "Card Statistics" in the main flashcards screen to bring up this screen:
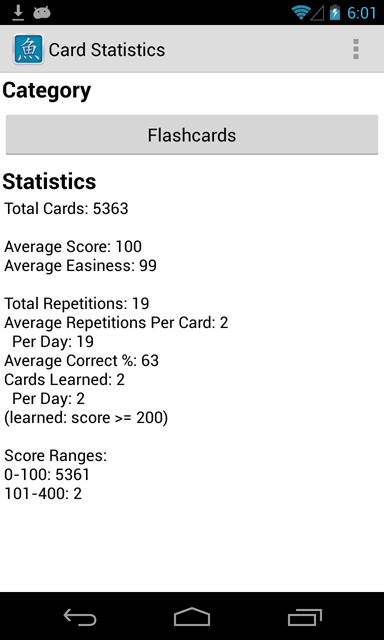
This screen provides a statistical summary of the progress you've made in studying flashcards. Choose "All" from the Category list at the top of the screen to display statistics for all cards, or choose a specific category to display statistics only for cards in that category. These statistics are all drawn from the scorefile of whatever profile is selected in "Review Flashcards."
Total Cards is the total number of flashcards in the selected category (or in your entire flashcard system with "All").
Average Score is the average card score, and Average Easiness the average easiness factor.
Total Repetitions is the total number of times that these cards have been individually reviewed. Each time you're tested on a card counts as a repetition, so a 100-card session would count as 100 repetitions (regardless of whether or not any of those cards were shown more than once).
Average Repetitions Per Card are the average number of times you've been tested on each card. Per Day are the average number of repetitions you've done each day since you started using Pleco flashcards.
Average Correct % is the average percentage of the time that you've remembered a card correctly (i.e., the ratio of total correct answers to total correct + incorrect answers).
Cards Learned is the number of cards that are "learned," based on however you've defined that in Card selection; Per Day is the average number of cards that have been added to this group each day since you started using Pleco flashcards.
Finally, Score Ranges lists the number of cards in each of a set of predefined score ranges.
Tap on "Review Flashcards" in the main flashcards screen, then on "Manage Profiles" to bring up the Manage Profiles screen:
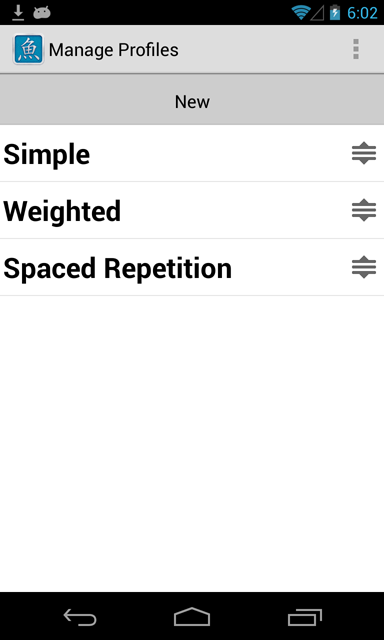
Use this screen to create, delete, and rearrange your flashcard profiles. A profile is a set of flashcard test settings; you can use profiles to save / retrieve those settings so that you don't have to reconfigure them each time. Any changes you make to the settings in "Review Flashcards" (or its sub-screens) will be saved to the profile you've selected at the top of that screen, and will be retrieved whenever you select that profile again.
Tap on New to create a new flashcard profile and select which scorefile will initially be associated with it. In the box that comes up asking you to enter a name for the new profile, select an existing scorefile from the "Scorefile" popup list to use that scorefile, or select "(create new)" to create a new scorefile with the same name as the new profile. If you're not using scorefiles, just leave this on the default option and all of your scores will stored in the same place.
Drag profiles around using the handles on the right side of each profile's name to reorder them. Tap on a profile's name to get a screen where you can change that name and access a few additional options. (renaming a profile will not change the name of the scorefile associated with it; go to Manage Scorefiles for that)
Tap on a profile to bring up a screen with additional options:
Rename Profile allows you to select a new name for the profile.
Duplicate Profile creates another profile with the same settings as the currently selected profile.
Reset Settings restores a flashcard profile to the default test settings - you'll be prompted to select one of the three default profiles (Simple, Weighted, or Spaced Repetition). "Simple" is the option to pick if you can't seem to access any cards, since by default it includes all of your flashcards in each session.
Delete Profile deletes the profile; this will not delete the scorefile associated with it, go to Manage Scorefiles for that.
Tap on "Review Flashcards" in the main flashcards screen, then on "Scoring," then on "Manage Scorefiles" to bring up the Manage Scorefiles screen.
Use this screen to create, delete, and rearrange your flashcard scorefiles. A scorefile is a set of flashcard scores and other statistics; the results of flashcard tests are saved to whatever scorefile you've selected in the Scoring screen, and scores from that scorefile are used to calculate which cards show up during flashcard sessions.
Tap on New to create a new scorefile; enter the name for the new scorefile in the box that pops up. You can also create a new scorefile automatically when you create a new profile in the Manage Profiles screen.
Drag scorefiles around using the handles on the right side of each scorefile's name to reorder them. Tap on a scorefile's name to get a screen where you can change that name and access a few additional options.
Rename Scorefile allows you to select a new name for the scorefile.
Duplicate Scorefile creates a copy of the scorefile, containing the same scores / statistics as the original file.
Reset Scores deletes all of the scores / statistics in the selected scorefile, resetting all of the card scores / easiness factors / in it to the default value and clearing all statistics / history info / etc.
Delete Scorefile deletes the scorefile.
To make a backup copy of your flashcard database, simply tap on the "Backup Database" command at the bottom of the main "Flashcards" screen. That'll leave you with a file on your Android device's SD card or internal storage which you can then copy wherever you like.
This backed-up copy of your database will contain all of your flashcard data: cards, their review histories and scores, profiles and profile settings, etc.
To restore a previous database backup, tap on the "Restore Database" command at the bottom of the main "Flashcards" screen and select your previously backed-up database file.
Please note that this will overwrite your current flashcards database, deleting any cards that are already in it, and that the backup file you restore from is copied to another location on your device before it's used by Pleco. The old copy will still be around, but it won't be updated - Pleco will add new cards / store test statistics / etc in another copy of the database that's not directly accessible to users (but that you can back up using the "Backup Database" command).
Return to Table of Contents