Pleco for Android Instruction Manual : Settings Reference
To open Pleco's settings screen, go to the main Pleco dictionary screen, press your device's menu button and tap "Settings" (bottom-right item).
To reset Pleco's configuration settings to their default values, open up the Settings screen, tap "General," and tap "Reset All."
The "Registration" section at the top of the Settings screen lets you view / update your current Pleco registration status, mostly relevant for people who purchased Pleco through our own online store or transferred it from a previous Palm / Windows Mobile / iOS purchase. See this page for information on how to purchase Pleco add-ons.
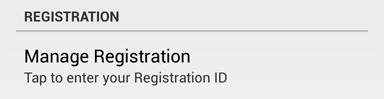
If you haven't bought or transferred over any Pleco add-ons yet, the top of the Settings screen will look like this:
You can ignore this section completely if you haven't bought any Pleco add-ons yet; it's only used for restoring previous purchases.
You can also ignore this section if you've only made purchases through Android Market - i.e., by going into the Add-ons screen and directly purchasing add-ons that are charged to your Google account. For those, simply go into Add-ons and tap "Restore Market Purchases" - no need to fiddle around with your ID since it can retrieve them from your active Android Market account.
However, for previous purchases made outside of Android Market, tap on Enter Registration ID to bring up this screen:
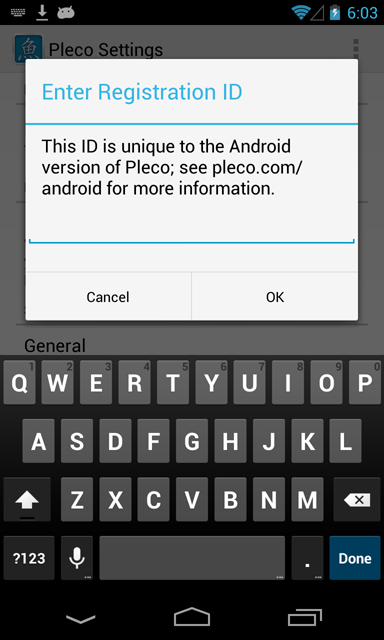
Enter your Registration ID and tap "OK" to transfer / reactivate your registration. You can retrieve your Registration ID from the My Orders page on our website; it's not the same as any other ID you were given for another platform, it's generated separately when you transfer your purchases over to Android. (see this page for instructions on how to perform that transfer)
If you've already registered Pleco, you'll see this screen when you tap on the item under "Registration" at the top of the Settings screen:
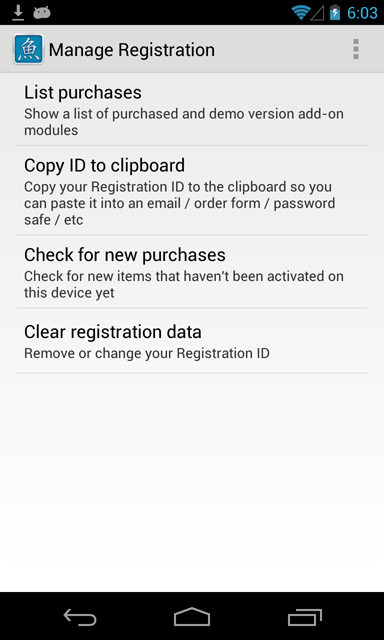
List purchases brings up a simple list of every currently-loaded database that Pleco thinks you've paid for - you can also get this information from the "Installed" tab in Add-ons.
Copy ID to clipboard copies your Registration ID to the clipboard so that you can easily paste it into another app / email / etc for safe keeping.
Check for new purchases contacts Pleco's servers to check if you're missing any recently-purchased add-ons associated with this Registration ID, and activates them if found.
Clear registration data erases your current registration and returns Pleco to its unregistered state; you can then transfer over a purchase from somewhere else.
General
Reset All: resets all of Pleco's configuration settings to their default values.
Regional Formats
Traditional characters: Use traditional rather than simplified characters in dictionary entry headwords, definitions, and example sentences.
Headword character set: selects how Pleco displays Chinese-character headwords which have both Simplified and Traditional character variants.
Pronunciation system: selects how Pleco displays the Mandarin Chinese pronunciations of characters and words.
Please note that since haven't yet encoded all of our dictionaries to use this multi-pronunciation system, example sentences in some dictionaries will still show up as Pinyin with tone marks regardless of what setting you select here.
Enable Cantonese: show Cantonese pronunciations (Jyutping romanized) along with Mandarin ones in the PLC dictionary - support in other dictionaries and for lots of other Cantonese features (audio, search, Yale romanization, dedicated Cantonese vocabulary) is coming soon.
Color Schemes
Enable Night Mode: enable this option to change Pleco's interface to "Night Mode," where text appears white-on-black and toolbars etc are also tinted black; useful both for night viewing and on devices where a black screen saves battery power (mostly those with OLED displays).
Interface colors: tap on this item to configure Pleco's color scheme settings with "Night Mode" disabled.
Tone Colors: brings up a separate screen to configure Pleco's Mandarin tone coloring feature. This draws Chinese character headwords in the dictionary in different colors depending on the tone of their Mandarin pronunciation, which may be helpful when trying to memorize the pronunciations of words.
Color tones in results: enable this option to color characters in the Entry List.
Color tones in entries: enable this option to color characters in dictionary definitions, including those in the Popup Definition bubble.
Tone 1/2/3/4/5 Color: tap on these items to configure the colors that correspond to each tone. If you're not familiar with tone numbers, see the chart here for a quick guide to which numbers represent which tones.
Night Mode Tone 1/2/3/4/5 Color: same as above, but applies when Night Mode is enabled.
Audio
Audio Settings: configure settings related to Pleco's audio pronunciation system.
Preferred gender: selects which set of recordings to use when playing audio.
- Male - Male speaker, the standard set of recordings included in the Pleco installer.
- Female - Female speaker, an alternate set of recordings available as a separate download on our website.
- Alternating - Alternates between male and female speakers each time you play audio.
- Alt (M 1st) - Alternates between male and female speakers, but always begins with a male speaker on each new dictionary entry or flashcard.
- Alt (F 1st) - Alternates between male and female speakers, but always begins with a female speaker on each new dictionary entry or flashcard.
Skip if no recording: with this option enabled, Pleco will only play audio for entries for which it has a full audio recording (i.e., one that exactly matches the word); with this option disabled, if it can't find an exact match it will play back the word syllable-by-syllable instead.
Sandhi transform: with this option enabled, for that syllable-by-syllable audio playback Pleco will attempt to apply sandhi tone transformations, i.e., two third tones turning into a second/third tone and the tones of "yi" and "bu" changing depending on context / meaning.
TTS Voice: select which of our two experimental text-to-speech modules (Hui and Lulu) will play by default; "Alternating" uses both.
Hui / Lulu TTS Speed: select the playback speed for TTS audio; by default this is set to 90% for both.
Fonts
Custom Fonts: configure custom Chinese and English fonts in Pleco.
Customize Chinese Font: install a custom Chinese font file. Almost any TrueType Chinese font should work, but you'll probably want one that has good support for both traditional and simplified characters in order to get text in Pleco to display correctly. Tap on this command, then select the font file to immediately install it. A good free Android-compatible font with comprehensive character set coverage is DroidSansFallbackFull.
If installing a new font causes Pleco to start crashing when you start it up, you can manually delete it by going into the /Android/data/com.pleco.chinesesystem/files/fonts/chinese directory on your SD card and deleting all of the font files inside of it.
Reset Font: clear your previously configured Chinese font file and return to the default system font.Customize English/Pinyin Font: same as above, for non-boldface English and Pinyin text - make sure this font supports Pinyin tone mark characters.
Customize English/Pinyin Bold Font: same as above, for boldface English and Pinyin text - again, make sure this font supports Pinyin tone mark characters.
Startup
Startup Actions: configure settings relating to various things that can happen when you initially open Pleco.
Open input: open up the input bar after you first launch Pleco so that you can immediately begin entering a new search term.
Invert back button: with this option enabled, Pleco will reopen the keyboard when you press the back button instead of closing it, and will then exit the app on an additional back button press.
Restore last search: enable this to remember the contents of the Search Field when exiting Pleco and restore them when reopening.
File storage location: configure the location where Pleco's database files are stored on your SD card. Changing this does not automatically move them, so what you'll want to do is change this, exit Pleco, kill it in the background via the Android Settings app / Applications, move the files to the new location, and then reopen Pleco. It will always check the two non-"Custom" locations if it can't find any files in the location you've configured, so if you screw this up and specify the wrong directory, move them back there and it should start up again without wanting to re-download its data files. To describe the three possible location choices a little more specifically:
Launchers: create custom launcher shortcuts to access specific Pleco modules from your device's home screen. If you have a third-party task manager app that allows you to create shortcuts to other apps, Pleco's modules should show up in the list of available shortcuts to generate in that app (if it doesn't, let us know and we'll try to support it in a future update).
Dictionary Launcher: launch the main dictionary search screen.
Search for clipboard: when invoking Pleco this way, search for whatever text is on the clipboard.
Only search if Chinese: only search on startup if this is Chinese text.
OCR Launcher: launch OCR.
Reader Launcher: launch the document reader.
Flash Launcher: launch flashcards. This will take you to the main flashcard home screen if you do not have a flashcard session active / saved, or will resume a saved session if one is active.
Task Management
Exclude Settings / Add-ons: don't include the Settings and Add-ons sections of Pleco in your recent task history.
Only include dict: don't include anything but the main Pleco dictionary screen in your recent task history.
Updates
Automatic update check: with this enabled, Pleco will automatically check for updates to its add-on databases once a week.
Tap on each item in this screen to go to its corresponding settings panel (see below).
Jump to: Main screen interface / Definition screen interface / Search settings / Input methods / Manage Dictionaries / Manage Dictionary Groups
These settings concern the arrangement of items on the main screen of the dictionary (where you enter words to search for and view the results).
Interface Layout
Portrait orientation: configure how Pleco should arrange its various buttons / boxes on the main screen in portrait (tall) orientation.
Landscape orientation: configure how Pleco should arrange its various buttons / boxes on the main screen in landscape (wide) orientation.
The options for both of these are identical:
List + Definition
Two-panel layout: with this option enabled, the definition of the currently-selected dictionary entry will be displayed right on the main screen, rather than in a separate view (as it was in our Palm OS / Windows Mobile software).
Definition location: determines where this definition is located on the screen (top / bottom / left / right).
List:definition size ratio: determines the relative sizes of the list and definition boxes. (1:2 would mean that the definition is twice as large or tall as the list)
Smaller search text: shrink the text in the search box so it'll accommodate more characters.
Show fast scroller: shows the standard Android thumb-scrolling control on the side of the Entry List while scrolling.
Show definition toolbar: in two-panel mode, show an extra toolbar at the bottom of the dictionary entry section of the screen allowing you to easily switch between multiple dictionaries without leaving your search results.
Controls (keyboard closed) - all of these apply when the keyboard is closed
Show quick input bar: shows the Quick Input Bar at the bottom of the Entry List, allowing one-button access to your desired text input method.
Show history button: show a button in the top toolbar to jump directly to the history screen.
Show scroll buttons: show buttons in the top toolbar to scroll to the next / previous entry. (only in Two-panel layout)
Show flashcard button: show a button in the top toolbar to add the current entry to flashcards. (only in Two-panel layout)
Show audio button: show a button in the top toolbar to play audio for the current dictionary entry. (only in Two-panel layout)
Controls (keyboard open) - all of these apply when the keyboard is open
Hide input method bar: hides the toolbar for choosing between handwriting / radical / keyboard / audio / OCR input, possibly useful if you have an Android input method that you like to use for both Pinyin and character searches.
Add full/wild buttons: replaces the speech recognition and OCR buttons in the input method bar with buttons to toggle full-text search on and off and to insert a wildcard character.
Keep definition visible: keeps the definition visible on the screen while you're inputting text, rather than hiding it and filling the entire screen with the Entry List. (only in Two-panel layout)
Hide menu button: hide the onscreen menu button (the three dots that normally appear in the top right corner of the screen) when the keyboard is open, to save a little extra space.
(other options are the same as in keyboard closed)
Lock orientation: prevent the screen from rotating while you're in the main dictionary search screen.
Disable auto-off: prevent the screen from turning off automatically while you're in the main dictionary search screen.
Entry list
Chinese-English: this screen controls the layout of individual items in the Entry List in the main Dictionary screen (and also in the compound words section of the definition screen). It affects only Chinese-to-English dictionary results, unless you've turned off the "Change layout for E-C" switch at the top of the English-Chinese panel.
English-Chinese: this does likewise for English-to-Chinese dictionary results, unless you turn off that option.
The options for both are identical:
Normal
Portrait orientation: These options configure the Entry List Layout when your device is in portrait (tall) orientation.
List Layout: determines which parts of each dictionary entry are included in the Entry List, and how they're arranged.
There are lots of choices here, but they're described by a simple system. "Head," "Pron," and "Defn" refer to the headword, pronunciation (Chinese-English only), and definition respectively. When they appear separated by a space - "Head Pron" for example - that means they appear in the same line of text, separated on that line by a space. When they appear separated by a / - "Head / Defn" for example - that means that they appear on separate lines.
So, "Head Pron / Defn" would mean the headword and pronunciation appear together on the first line of each Entry List item, then the definition follows on the next line. "Head / Pron / Defn" would have the headword, pronunciation, and definition all on different lines, and "Head Pron Defn" would have them all appear in a single block.
Headword font size: determines the font size of headwords in Entry List items. (and of any other items that follow them on the same line of text)
Pronunciation font size: determines the font size of Mandarin pronunciations in Entry List items. (and of any other items that follow them on the same line of text)
Definition font size: determines the font size of definitions in Entry List items.
Maximum # of lines: determines how many lines of each definition are displayed on the screen.
Landscape orientation: These options are exactly the same as for "Portrait Orientation" above, but apply when your device is in landscape (wide) orientation.
Keyboard
Change for keyboard: with this option enabled, you can configure an alternate Entry List layout / font sizes for use when the keyboard is open; this is useful if you want to fit more dictionary entries on the screen at once in that mode (at the expense of some detail) so that you can quickly scan through search results. The Portrait orientation / Landscape orientation sections that appear below this correspond to "Portrait" and "Landscape" above.
Show flash status: show an indicator icon next to Entry List items to let you know whether or not they're part of a flashcard list. (this can negatively impact performance, which is why we leave it off by default)
History
Always save first result: always save the first search result to your recently viewed entry history, even if you don't tap on it. (normally entries are only saved to history if you tap on them to view them)
Show history times: show the times that a particular item was last viewed / searched for in the history screen.
Settings relating to the display of dictionary entries.
Font sizes
Headword font size: set the font size for (Chinese-English) dictionary headwords.
Don't magnify head if >: set a threshold (number of characters) beyond which headwords will be displayed at the same size as the definition - this is useful with very long phrases (like Chengyu) that might otherwise take up most of the screen.
Body font size: set the font size for the pronunciations / definitions of words. (and the words themselves in English-Chinese)
Definition text
Don't replace headword: enable this to leave instances of the dictionary headword in example sentences intact, rather than replacing them with a tilde (~). At present, this option can only be changed for a few of our dictionaries (PLC and ABC), though we're working to add support for it to other dictionaries as well; for now, though, those dictionaries will always show / ~-replace headwords in examples (depending on how the publisher / author designed them).
Color headword: with the above option turned off, color instances of the dictionary headword in the definition to make them easier to spot. Example headword color lets you change the color used for this, and there's a Night ex head color option that applies when Night Mode is enabled.
Separate parts: with this option enabled, the headword / pronunciation / definition in dictionary entries will be separated by newlines, rather than all being jammed together.
Other tabs
Stroke order diagrams: configure options related to the display of stroke order diagrams.
Stroke order background: change the background image of stroke order diagrams; you can replace the default blank background with a 2x2 or 3x3 grid or a 2x2 grid with diagonal lines.
Show outline: show the outline of characters in the stroke order diagram screen
Drawing speed: control how quickly stroke order diagrams animate, from Very Slow to Very Fast.
Animate on Next: with this option enabled, tapping on the "Next" button (to advance the stroke order diagram a single stroke) will animate the drawing of that stroke; otherwise, it'll fill in the stroke immediately.
Characters: configure options related to the display of character components and compounds.
Flatten components: filters the list of components that make up the current character to only include the first-level breakdown; i.e., it'll break up the character into its immediate component parts, but it won't then break down each of those components further. So 跃 would break down to 足 and 夭 but the 足 would not be broken down further to its constituent 口.
Flatten compounds: filters the list of compound characters that contain the current character so that it only includes characters that contain it as part of their first-level breakdown. So in the above example, 口's compound list would include 足 but not 跃.
Common compounds: filters the list of compound characters to only include characters that are covered by one of your installed dictionaries.
Words: configure options related to the display of words containing a character.
Sort merged by frequency: sort items in this list by frequency when viewing a merged list of results from all dictionaries.
Tap on each item in this screen to go to its corresponding settings panel (see below).
Jump to: Input processing / Full-text / Wildcards / Search dictionaries / Result display
Auto-detect language: select whether Pleco should automatically detect whether a dictionary search is in Chinese or English. With "Enabled," it'll do this with all search terms, even Pinyin; "Hanzi Only" will cause it to switch to Chinese mode when it detects Chinese characters in the Search Field but do nothing otherwise, and "Disabled" prevents it from ever changing the search language automatically; you can still manually tap on the Switch Language toolbar button (or select the corresponding menu command) to switch between English and Chinese searches.
Allow extra characters: this option lets you customize whether Pleco will prioritize search results that exactly match the length of the search query over longer results. This deals with the situation where you might be looking for a two-character word, one dictionary has an entry for a four-character expression beginning with those two characters while another dictionary has an entry for those two characters exactly. With this option enabled, Pleco will always search all dictionaries for an exact length match before accepting a longer one, while with it disabled, it'll always accept a match in the current dictionary even if it's longer than the search query.
Enable suggestions: allow input methods to suggest words as you type, primarily useful with some third-party Pinyin input methods.
Don't split incomplete: with this option disabled, Pleco will attempt to break down character searches for which it can't find a complete match into their constituent characters / shorter words; this takes a bit longer, but on most devices our search engine is so fast that you won't notice it, and it saves you from having to exit / delete characters from the search query to see what the later characters in it mean.
Pinyin processing
Flexible syllable splits: with this option enabled, Pleco will search for any combination of Pinyin syllables that matches the spelling of your search query, assuming you haven't entered tones or other marks to specifically split them - "xian" will match both "xian" and "xi'an" and "changan" will match both "chang'an" and "changan." Disable this option and Pleco will require mid-word syllables beginning with a vowel to have a space, apostrophe, or tone number in front of them, so "xian" would only match "xian."
Match syllables exactly: with this option enabled, Pinyin searches will only return results that exactly match the search query entered. For example, "zhonggu" would match only the word zhong1gu3 and not zhong1guo2. Turning this option off means you don't have to finish entering a word to get search results for it, but you may need to look through more entries to find the word you want.
Combine umlauts: with this option enabled, Pleco treats Pinyin u and ü as the same character; enter a 'u' and you'll see matches for both. With it disabled, you'll have to type an actual ü or a v to enter syllables like lü.
Fuzzy English matching: with this option enabled, words that are spelled differently in different dialects of English will match against any spelling variation - "colour" will match "color" and vice versa.
Integrate into English: with this option enabled, searches in Pleco for English words will span both English-to-Chinese and Chinese-to-English dictionaries, searching the full text of entries in the latter. Integrate into Chinese does the same with searches for Chinese words (characters only).
Don't sort by relevance: by default, Pleco sorts full-text (English-Chinese) search results by their relevance, putting the entries where the search term is listed by itself first, followed by entries where it comes first, entries where it appears anywhere in the definition, and entries where it appears in a parenthetical or an example sentence. If you turn on this option then they'll all be lumped together in a single, Pinyin-sorted list.
Full-text search prefix: selects which character is used to invoke a full-text search. Enter this character at the start of a search query to tell Pleco to search dictionary definitions instead of headwords; it'll return a list of all dictionary entries which contain that word in their definitions. Enabling Keep on clear will prevent this character from being deleted when the rest of the Search Field is cleared - this is useful if you want to do a bunch of full-text searches in a row (for example, to find usage examples for a list of new words you're learning). With it enabled, you can still delete the full-text prefix with a backspace.
Alt Single-char wildcard / Multi-char wildcard: selects which characters are used as wildcards in dictionary searches in addition to the default ? and *.
The single-character wildcard replaces exactly one character/syllable, so "@hao3" for example would find you all words in which the second syllable was pronounced "hao3".
The multi-character wildcard replaces anywhere between 0 and 3 characters/syllables, so "$hao3" would return all entries in which the first, second, third, or fourth syllable was pronounced "hao3".
Dictionary search order: this controls the order in which dictionaries are searched. "From Current" will begin the search with the currently-selected dictionary or group, "From First" will begin all searches with the first dictionary or group in the search order (as configured in Manage Dictionaries), and "Current Only" will only search for words in the current dictionary / group and won't check any others unless you specifically switch into them. "From First" is particularly useful if there's a smaller dictionary you prefer over the larger ones, since it'll let you always check that dictionary for a result first before falling back on the larger dictionaries.
Reset to first if single dict: this option will cause Pleco to automatically return to the first dictionary or group in the search order (basically the same as "From First" above) if you're viewing something other than a dictionary group - this would be useful if, for example, you like to mix both regular and full-text English-Chinese searches and hence want Pleco to stay in whichever dictionary group you've selected, but don't want it to stay in a single dictionary if you temporarily select one to view results from it.
Stop on partial match: this option affects the way in which Pleco switches between dictionaries when you tap on the Dictionary Switch button while in the middle of a search (i.e., when there's text entered in the Search Field). With this option disabled, Pleco will only switch to dictionaries with the longest possible match (maximum number of matching characters) for the search term, skipping over any others; with it enabled, Pleco will switch to any dictionary with even a 1-character match.
Skip demo dicts: with this option enabled, Pleco will skip over any demo-version dictionaries in searches, though you can still switch to them by tap-holding on the Switch Dictionary button.
Results sort order: determines how Pleco sorts the results of Chinese-language dictionary searches.
1-char for 1-char: with this option enabled, searches with one Chinese character or one Mandarin syllable will only return results that are also one character / one syllable long. This makes those searches significantly faster, and is also helpful if you know the Pinyin for the first character of a word: enter the Pinyin, tap on the > next to the matching character in the Entry List, then scroll down to the word with the matching second-syllable Pinyin.
Merged multi-dict search: this option - now on by default and an increasingly integral part of Pleco - enables the use of dictionary groups to search multiple dictionaries at the same time and return all of the results from them in a single, integrated list. Show dicts in results adds a little icon to each merged result to tell you which dictionary it came from (if there's more than one, it gives you the one that ranks highest in Manage Dictionaries).
Legacy empty dict switching: this option brings back the (quirky, but essential to many long-time users) behavior from old versions of Pleco in which, when switching dictionaries with the search field empty, you're taken to the first result from your last search of the current dictionary instead of being presented with the usual menu of browse / help / etc options.
Tap on each item in this screen to go to its corresponding settings panel (see below).
Jump to: Handwriting input / Radical input / Keyboard / Speech
There's also one option shared by both panels:
Left-handed interface: put the bar with the Done / backspace buttons on the left side of the screen when in landscape (wide) orientation, useful for left-handed users.
Character sets - all of these toggle whether or not the recognizer will recognize a particular group of characters.
Common Simplified: enables recognition of Simplified characters (used in mainland China and Singapore) in the handwriting recognizer. Rare Simplified includes uncommon as well as common Simplified characters, at the expense of more false positives / incorrect results (the more characters Pleco can potentially recognize, the more likely it is to match what you drew to the wrong character).
Common Traditional: enables recognition of Traditional characters (used in Taiwan and Hong Kong) in the handwriting recognizer. Rare Traditional works as with Rare Simplified above. Hong Kong also adds support for special characters used only in Hong Kong; these aren't well-supported by our dictionaries, but single character definitions should be covered at least.
Cursive: improves the handwriting recognizer's support for cursive (Chinese) handwriting, at the expense of a few more false matches for non-cursive (stroke-by-stroke). Clearly-drawn cursive characters should be recognized even with this option disabled, but enabling it increases its tolerance for joined strokes.
Interface
Use full screen: on by default on smartphones and off by default on tablets; with this option enabled, Pleco will keep the handwriting input box in the bottom half of the screen only and allow you to continue using the regular dictionary search interface in the top half.
Second chars on tap: with this option enabled, when you tap on a character in the list of recognizer results, it replaces that list with a list of the most frequent characters that follow the character you selected, making it easier to enter multi-character words. (this option is always disabled in flashcard fill-in-the-blanks tests)
Stroke thickness: configure how thick the line you draw with your finger appears in the drawing box, from Very Thin to Very Thick.
Use full screen: on by default on smartphones and off by default on tablets; with this option enabled, Pleco will keep the radical input box in the bottom half of the screen only and allow you to continue using the regular dictionary search interface in the top half.
Character set filter: with this option enabled, tapping on a radical that's specific to Simplified or Traditional characters (i.e., one that always appears differently in the other character set) will only show you characters with the radical in that character set; otherwise, tapping on (for example) the simplified-character speech radical would show you characters that contain both the simplified and traditional versions of that radical.
Include unused characters: include characters in the radical table that aren't covered by any of your currently-installed dictionaries (though they may still be included in the Unihan database / Char Info screen).
Disable suggestions: disable the auto-suggest feature on many Android devices' keyboards, so you won't end up with Pinyin queries being interpreted as misspelled English.
Alternate method: use an alternate method to do this that works better on phones from some manufacturers; since it can cause problems on others, we leave it off by default, but if the above does not work correctly we recommend turning it on and seeing if that improves matters.
Voice recognition language: choose whether tapping on the microphone icon in the main dictionary search screen will cause Pleco to recognize speech in Mandarin, Cantonese, or English. You can also change this option by tap-holding on that icon.
Duplicate Card Handling - configure how Pleco handles duplicated flashcards, i.e. flashcards for which another flashcard with the same headword and pronunciation already exists.
Already in category: configures how Pleco handles duplicate cards that are already in the category you've chosen to add them to (by tap-holding on the + button).
Not in category: configures how Pleco handles duplicate cards that are not already in the category you've chosen to add them to.
Categories
Default category: selects the category which new cards will be added to by default; this affects flashcards created anywhere except by a flashcard import, or by the Organize Cards screen once you've gone into a specific category (with those it's added to that category instead).
Non-sticky selection: normally, when you tap-hold on the Add Card button to choose a specific category for your new card, the category you select will become the new default category for future card adds. This disables that feature so that the default category can only be changed from this screen.
Always prompt: with this option enabled, the list of categories will come up whenever you even just tap on the Add Card button - no need to tap-hold, every time you create a card you'll be prompted for which category to add it to.
Multi-level prompt: normally, that tap-hold category prompt will only show you categories at the top level of your category hierarchy (categories that aren't grouped under any other categories, in other words); enable this option to choose categories at any level instead. (with a slightly more cumbersome interface)
Card Lists
This section concerns the appearance of flashcards listed in the Organize Cards and Search Cards screens.
Use custom layout: use a custom layout for the cards, rather than relying on the one configured for Chinese-English dictionary entries.
Configure layout: configure how this layout will be arranged:
List layout / Headword font size / Pronunciation font size / Definition font size / # defn lines: all of these options are the same as in the regular Entry List settings screens.
Show card statistics: add an additional line of statistics to each card, giving you the card's score, easiness factor, record of correct/incorrect answers, and last reviewed date. Statistics font size chooses a font size for this line of statistics.
Interface
Lock orientation: lock the screen orientation while in the flashcard test screen to prevent accidental rotations.
Enable English-to-Chinese: enables (somewhat experimental) support for English-to-Chinese flashcards. This will allow you to create flashcards from English-to-Chinese dictionary entries (the button will be grayed out otherwise), and adds options to the Import and Export screens to select the language for text-based imports and exports, adds an option to Card Filters to select which language you'd like to study cards in, and adds an option to Search Cards to find cards by their language.
Erase Database
Compact Database: clean up Pleco's flashcard database file, saving space and possibly making it run a bit faster if done after deleting a lot of flashcards.
Erase Database: this button permanently erases your entire flashcard database, allowing you to get a fresh start with a clean new database. (useful if you feel like it's gotten bloated with too many cards and don't want to delete cards individually / with a batch command)
Menu default still: open OCR by default in still-image mode when invoked from the Android menu bar (i.e., from pressing the menu button and then tapping "OCR").
Toolbar default still: open OCR by default in still-image mode when invoked by pressing the camera button in the Pleco input toolbar or Quick Input Bar.
Copy result to clipboard: copy the most recent OCR result to the clipboard when backgrounding or exiting the OCR module.
Live Video
Live Video OCR Settings: takes you to a separate screen to configure Pleco's live-video OCR modes in detail.
Still Image
Still Image OCR Settings: takes you to a separate screen to configure Pleco's live-video OCR modes in detail.
Other
Unknown word handling: controls how the system handles blocks of characters that don't have an associated dictionary entry. With "Ignore," it simply refuses to capture them; with "Truncate," it finds the longest dictionary entry it can and captures that, with "Custom Card," it brings up a screen to create a custom flashcard, prepopulated with the characters you scanned in the Headword boxes, and with "Custom Dict Entry" it creates a new user dictionary entry and links the new flashcard to it.
Append reader text: combines the results of all "Send to Reader" outputs in a particular session; in other words, each time you choose "Send to Reader" from the menu, it appends the captured text to the previous output instead of replacing it, so that you end up with a collection of all of the text you've captured since opening OCR.
Left-handed interface: flip the OCR interface for left-handed users. (buttons on the left in landscape orientation and simply reversed in portrait)
Interface
Tap video to pause: with this option enabled, you can tap anywhere in the video area to pause the recognizer. Enable Only while held down and the recognizer will immediately un-pause when you lift your finger from the screen (though you can drag your finger down while paused to "lock" this and require a tap to unpause).
Tap video to resume: with this option enabled, you can tap anywhere in the video area to resume the recognizer when it's paused.
Tap video to re-focus: with this option enabled, you can tap anywhere in the video area to re-focus the camera.
Pulse mode: with this option enabled, the OCR system will only run when you press the "Pulse" button (which replaces the pause button), rather than running continuously until paused.
Motion Detection
Enable motion detection: activates our advanced motion detection system, which uses input from your device's motion sensors along with advanced video analysis techniques to detect when the camera (or the thing it's pointing at) is moving and pause the recognizer when it's not (avoiding "jitter" when it keeps re-recognizing the same characters).
Configure motion detection: takes you to a separate screen where you can configure the motion detection system in more detail.
Recognition
Max defn update speed: change this to something other than "None" to limit the speed at which the dictionary definition will update, useful if you find that it changes too frequently.
Auto white-on-black: enable auto-detection of black-on-white and white-on-black text.
Word detect samples: configure how many frames in a row the recognizer has to see the same text before "locking on" to it; increasing this number will make the definition change more slowly / become less "jittery" in general, while decreasing it will make it more responsive.
Word detect match len: configure the number of characters at the start of the word that have to match in order for the system to "lock on"; consider increasing this number if you capture a lot of long words.
Allow multiple lines: turning this on keeps the recognizer from assuming that it's looking at a single line of text, so that it won't get mixed up and think that bits of characters it on the next / previous line are part of the characters you're trying to scan; turning this off can improve performance but requires you to be a bit more exact in positioning the recognizer box in order to avoid garbled output.
Orientation
These options are both designed to help accommodate Android devices with very buggy camera drivers - most of the bugs seem to relate to the fact that manufacturers don't test their devices with the screen orientated in any direction other than the one used by their Camera app, so the screen ends up rotated incorrectly when we try to access it.
Camera orientation: configures how the camera image is rotated relative to the screen. Default rotates it however Android tells us to (i.e., it asks the OS how the camera is rotated relative to the screen and rotates the image accordingly). Default + 90 / 180 / 270 degrees offsets that rotation, useful on some devices on which the camera is actually flipped or reversed from where it's supposed to be. Camera Natural doesn't change the camera image rotation at all, it goes with whatever the camera initially defaults to - useful on very buggy devices where the manufacturer never even bothered to implement camera orientation support at all. Always 0/90/180/270 degrees fixes the rotation at a particular angle relative to the display regardless of how the device is oriented.
Screen orientation: forces the screen to stay in a particular orientation, useful with the Camera Natural / Always options above and on devices where OCR simply doesn't work in more than one orientation. Auto switches between portrait and landscape when you rotate your phone, as in a normal Android app; Always portrait forces it to always stay in portrait (tall) orientation, Always landscape in landscape (wide) orientation, and Always reverse landscape in upside-down landscape orientation (which generally means the bottom of the phone is on the right instead of the left).
Alternate video display: changes the way that Pleco draws video to the screen (using a different type of user interface control) - this works around video display issues on a few devices (particularly some Sony Ericsson ones).
Flashcard Capture
Delay before card add: time after "locking on" to a word that the system waits before adding it to flashcards.
Beep on card add: play a beeping noise whenever the system creates a card.
Other Settings
Hide chars when paused: hides all overlay characters (even highlighted ones) when the recognizer is paused.
Hide non-highlighted: hide characters that aren't highlighted, regardless of whether or not the recognizer is paused.
Default to macro mode: default to using macro focus mode on compatible devices. This greatly improves close-up focus, but you need to turn it off (by tapping on the "flower" icon in the toolbar) to look at farther-away objects.
Focus continuously: enable continuous auto-focus mode, avoiding the need to manually tap on the "focus" button. You can also toggle this on and off using the [AF] button in the main OCR interface.
Prefer Pleco autofocus: many Android phones ship with built-in continuous autofocus support, but some of them do it in an extremely buggy way, so if you find that continuous autofocus misbehaves a lot try turning this option on to force your phone to use Pleco's continuous autofocus algorithm instead.
Disable auto-off: prevent your device from automatically turning off (from lack of touch input, e.g.) while using OCR.
Basic Settings
Mode: determines how Pleco detects that your device is moving; Motion Sensor uses the built-in acceleration sensor and gyroscope, Video Analysis analyzes the difference between frames of video, and Sensor + Video combines both techniques. In general we recommend keeping this on "Sensor + Video," but if your hands are very shaky you may find that "Video Analysis" by itself works better, or if you want to save battery life or are in a situation where there's lots of other movement going on the images you're looking at (subtitles / street signs, e.g.), "Motion Sensor" by itself might work better.
Delay before pause: determines how long Pleco waits for the device to stop moving before it automatically pauses the recognizer.
Button-only resume: with this option enabled, after automatically pausing the recognizer Pleco won't un-pause it until you manually tap on the "resume" button.
Video Analysis
Video pause threshold: determines the level of video motion below which the recognizer will automatically pause; if you set this to 50%, the recognizer will only pause when the device is moving at half the speed it would pause at with this set to 100%. So in other words, if you find that the recognizer is pausing too much (i.e. while you're still moving the device), you should increase this setting, while if you find that it's pausing too little (i.e. not pausing when you're holding the device steady), you should decrease it.
Video resume threshold: determines the level of video motion above which the recognizer will automatically resume when paused; if you set this to 50%, the device will only have to be moving at half the speed to automatically resume that it would have to be moving at with this set to 100%. So in other words, if you find that the recognizer is resuming too soon (i.e., it starts recognizing again while you're still pointing at the same word), you should increase this setting, while if you find that it's resuming too late (i.e., you start moving the device but the recognizer remains paused), you should decrease it.
It's usually best to keep the Pause and Resume threshold values at the same percentage (both 80%, both 110%, etc); you should only set them to different values if you find that one function is triggering at the correct speed and the other isn't. If you do change them separately, we recommend that you not set the pause threshold more than 20 percentage points higher than the resume threshold - you might experience strange behavior otherwise.
Motion Sensor
Sensor pause threshold: determines the pause threshold for changes to the device's acceleration, i.e. which direction its velocity is increasing or decreasing in.
Sensor resume threshold: determines the resume threshold for changes to the device's acceleration.
Auto white-on-black: enable auto-detection of black-on-white and white-on-black text.
Allow multiple lines: turning this on keeps the recognizer from assuming that it's looking at a single line of text, so that it won't get mixed up and think that bits of characters it on the next / previous line are part of the characters you're trying to scan; turning this off can improve performance but requires you to be a bit more exact in positioning the recognizer box in order to avoid garbled output.
User Interface
Font size: determines the font size used when viewing clipboard clippings and text files.
Larger margins: expand the size of margins in document reader text files / pasteboard viewing.
Lock to bottom: with this option enabled, the popup definition "bubble" will always remain at the bottom of the screen rather than moving around depending on the text selection location.
Volume buttons scroll: with this option enabled, pressing your device's volume buttons will scroll to the previous / next page of text.
Dpad buttons scroll: same as above but with direction pad buttons, which on some Android e-readers are also the page turning buttons.
Disable auto-off: enable this to prevent your device from automatically turning off while in the document reader.
Lock orientation: lock the screen orientation while in the document reader screen to prevent accidental rotations.
Ignore file extensions: allow the text file reader to open up documents that do not appear to be text files (if you happen to have files that you'd like to read which don't use the correct file extensions).
Interface
Font size: configure the font size for text in the popup definition "bubble."
Unknown word handling: controls how the system creates flashcards when you've selected a block of text with the popup definition system that doesn't correspond to a dictionary entry. With "Truncate," it finds the longest matching dictionary entry it can and captures that, with "Custom Card," it brings up a screen to create a custom flashcard, prepopulated with the characters you scanned in the Headword boxes, and with "Custom Dict Entry" it creates a new user dictionary entry and links the new flashcard to it.
Arrows on top: flip the position of the toolbars on the top / bottom of the screen, so that the arrows used to move the Popup Definition highlight are at the top instead of the bottom. (may be a more comfortable finger location for some people)
Move arrows on left: flip the position of the arrows in the toolbar so that the arrows used to move the highlight are on the left, while those used to resize it are on the right. This puts the move arrows closer to the thumb position for left-handed users, possibly making them easier to operate with one hand.
Open input on search: enable this to open up the input bar whenever you tap on the Search for Selection button in the Popup Definition toolbars.
Exit reader on view entry: enable this to close the Popup Definition bubble when you tap on the Go to Entry or Character Info buttons.
Sticky dict selection: remember the last manually-selected dictionary and default to that dictionary when reopening the Popup Definition bubble / advancing to a new word.
Auto-play audio on tap: automatically play audio for any word that you tap on.
Auto-play on advance too: also do this when tapping on the popup definition arrow buttons to move to the next / previous word.
History
Save on tap: save the current dictionary entry to the popup definition history when you initially tap on a word - whatever entry comes up is added to history.
Save on go: save the current dictionary entry to the popup definition history when you tap on the > button to view the entry full-screen.
Save on selection change: save the current dictionary to the popup definition history whenever you change the selection with the arrow buttons.
Headwords
Headword tap action: the default "Select Character" causes Pleco to bring up a definition for just the character you tapped on when you tap on a character in a dictionary headword; "Select Word" will cause it to select the whole word.
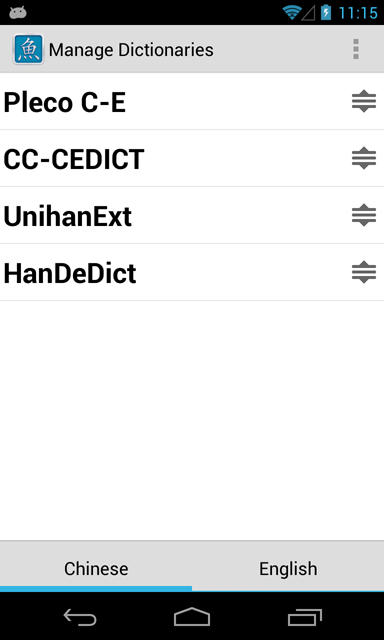
The Manage Dictionaries screen lets you configure the order in which dictionaries are searched and enable / disable them in dictionary searches.
Tap / drag the handles at the right of each dictionary to change their position in the search order.
Tap on the Chinese and English buttons at the bottom of the screen to switch between reorganizing Chinese-to-English and English-to-Chinese dictionaries.
An additional Add User button will appear here if you've purchased the Flashcard System add-on module and hence have access to Pleco's user-created dictionary system; see the dictionary manual for more on that.
Tap on the name of a dictionary to view / change its settings in more detail:
Browse all dictionary entries: view a list of every entry in the dictionary; mostly helpful in user dictionaries (where there's the additional option to edit / delete entries), but also fun if you feel like reproducing the experience of flipping randomly through a paper dictionary.
Basic Settings
Use in dictionary: include this dictionary in dictionary searches. (otherwise it'll be totally disabled)
Sticky selection: don't automatically switch from this dictionary to a different one during search once you've selected it, even if a better match is found in another dictionary. This is mainly useful for subject-specific dictionaries where you want to temporarily confine your searches to just that dictionary.
Use in reader: use this dictionary to look up words in the Popup Definition window.
Use in OCR: use this dictionary to look up words in OCR.
Fallback only: only include this dictionary in searches when no other (non-fallback) dictionary has a matching entry, and switch out of it immediately as soon as a different search is entered that can be found anywhere. This is useful for titles like Unihan which you might only want to use when you can't find a character in any other dictionary.
Skip with button: skip over / don't alight on this dictionary when cycling through dictionaries with the Switch Dictionary button.
Hide in menu: don't show this dictionary in the menu that pops up when you tap-hold on the Switch Dictionary button.
Icon
Abbreviation: change the letters (up to three) that appear in the dictionary's icon. This is useful if you have difficulty quickly telling the difference between certain letters.
Reset to default abbreviation: reset the dictionary icon to its default display settings.
Information
Short Name, Full Name, Copyright, and Number of Entries are all exactly what they sound like.
Additional options will appear here for user dictionaries; see the dictionary manual for more on those.
By default, Pleco searches every dictionary you've installed and returns a sorted / collated list of matches from all of them; it also allows you to switch to individual dictionaries and view only their results via the Switch Dictionary button.
Dictionary groups provide a third option: you can search some of your dictionaries and return a sorted / collated list of matches from those, but exclude results from other dictionaries. This can be useful if you have more than one dictionary that you like to search for Classical Chinese or Traditional Chinese Medicine words, for example, but you don't want to bother with extraneous results from dictionaries that don't cover those. It can also be useful if you want to search every dictionary but with a different priority order from what's configured in Manage Dicts.
Technically, all merged searches are done in dictionary groups - Pleco has six special built-in groups that search all of your dictionaries for a particular language pair, in whatever priority order you've configured in Manage Dicts. So the [C] that you often see in the dictionary search screen actually connotes a particular dictionary group that you're searching. You can't change the composition of these built-in groups, but you can lower their priority or disable them altogether in favor of your own. The six groups are:
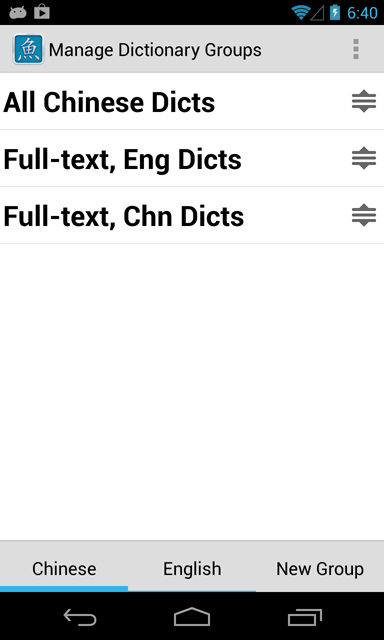
Chinese
English
Tap / drag the handles at the right of each dictionary group to change their position in the search order; dictionary groups always come up before single dictionaries.
Tap on the Chinese and English buttons at the bottom of the screen to switch between reorganizing Chinese-to-English and English-to-Chinese dictionary groups. Tap on New Group to create a new dictionary group.
Tap on the name of a dictionary group to view / change its settings in more detail:
Most of these are similar to options in the regular Manage Dicts screen:
Basic Settings
Disable: disable this dictionary group altogether, but don't delete it (useful if you want to disable it temporarily, or if it's a built-in group that you can't get rid of).
Sticky selection: don't automatically switch from this dictionary group to a different one during search once you've selected it, even if a better match is found in another dictionary or group. This is mainly useful for subject-specific groups where you want to temporarily confine your searches to just that group.
Full-text search only: only include this dictionary group in forced full-text searches (ones where you prefix the search term with a #); this is how we get the disabled-by-default full-text search groups to still show up when you do a full-text search.
Fallback only: only include this dictionary group in searches when no other (non-fallback) group has a matching entry, and switch out of it immediately as soon as a different search is entered that can be found anywhere.
Skip with button: skip over / don't alight on this dictionary group when cycling through dictionaries with the Switch Dictionary button.
Hide in menu: don't show this dictionary group in the menu that pops up when you tap-hold on the Switch Dictionary button.
Dictionaries
Dictionary Type: Chinese-English or English-Chinese, and whether or not it's full-text. This is configured when the group is created and cannot be changed later without deleting and re-creating it.
Choose Dictionaries: pick which dictionaries you'd like to include in this group. Disabled in the built-in ones since they automatically include all dictionaries.
Information
Name: display name for this dictionary group.
Icon Abbreviation: abbreviation used in this dictionary group's Switch Dictionary button icon.
Operations
DELETE DICT GROUP: permanently delete this dictionary group.
A few additional commands appear at the bottom of the Settings tab:
About Pleco: bring up a screen with copyright / version info.
The next five commands all require you to have a valid email account configured on your device:
Contact Support: send a message to Pleco technical support. You can also contact us via our website or at support@pleco.com, but sending a support request through this button embeds some extra information (software version, OS version, device identifier, language locale) which can help us to deal with your issue more quickly.
Send Feedback: send us general feedback / suggestions on our software.
Report Missing Word: provides a convenient way to let us know when you can't find a good match for a particular word; we'll try to update our PLC dictionary database with frequently-searched-for missing words. Tapping on this button will pop up a screen where you can scroll through / select a recent search query (there's also a "none" option) - tap on the word you want to report missing, add any details you can about the missing word (where you encountered it, what it might mean, etc), and tap send. We automatically embed the selected query and a list of your currently-installed dictionaries in the message.
Report Incorrect Entry: as above, but this one is for reporting mistakes in specific dictionary entries - choose the entry you want to report and it'll preformat an email template to help us find it.
Mailing List Signup: sign up for our email announcement list - we write very nice detailed announcement emails, and not too many of them (generally only a few per year, in conjunction with major product releases / updates).
Return to Table of Contents